Tools for Spherical Mirror ProjectionWritten by Paul BourkeContents
Short history and older software by the author
In 2003 the author developed the idea of using a spherical mirror for fulldome projection instead of the much more expensive fisheye lens options. Initially fisheye movies were pre-warped but it was quickly realised that was not a sensible approach, rather the fisheye movie should be warped during playback. Fortunately this is something that is straightforward for the graphics cards of the time and now. In 2005 the warpplayer software was developed to do exactly that, for Apple Macs. Later in 2013, a modified version of VLC was created that supports real-time warping and was available for Mac and Windows. Unfortunately the above two solutions are showing their age and the realities of the technology they were built on means they are difficult to maintain. On the Mac at least, the following is an attempt to bring things up to date and base the solution on a more stable and future-proof (as far as one can) footing. Before purchasing
All the playback solutions below have demonstration versions, PLEASE download and test these before purchasing. If for some reason the demo version does not work for you please contact the author. Please be advised that some of the downloads are rather large, this is due to the inclusion of short fisheye movies for testing purposes. The applications are provided as gzipped DMG files. Simply double click to unzip. Double click on the the resulting DMG file to create a virtual hard drive containing the software. Create a directory at a location of your choice on your computer and copy all the items into that directory.
As is the case for applications not distributed through the app store, the security
features in current versions of MacOS may prevent them from running, quoting that they
are from an unidentified developer. To circumvent this, choose the "Open" option in
the popup menu if you right mouse click on the application, of if you don't have a
three button mouse use Control left mouse click.
Introduction
The following documents a new (2019) Apple Mac fisheye movie playback solution for planetariums using a spherical mirror projection system. It is intended to replace the older, and less featured, WarpPlayer application. It includes a simple control pane to select between different user installed fisheye movies, volume control, fisheye positioning, pause/play button and a preview on the operator console. And of course it allows one to supply a custom warp mesh for precise warping. Display settings
The software expects two displays, the primary display identified by having the Apple menu bar along the top, and a secondary display attached to the data projector. These displays should not be mirrored, the settings accessed from the system preferences are shown below. 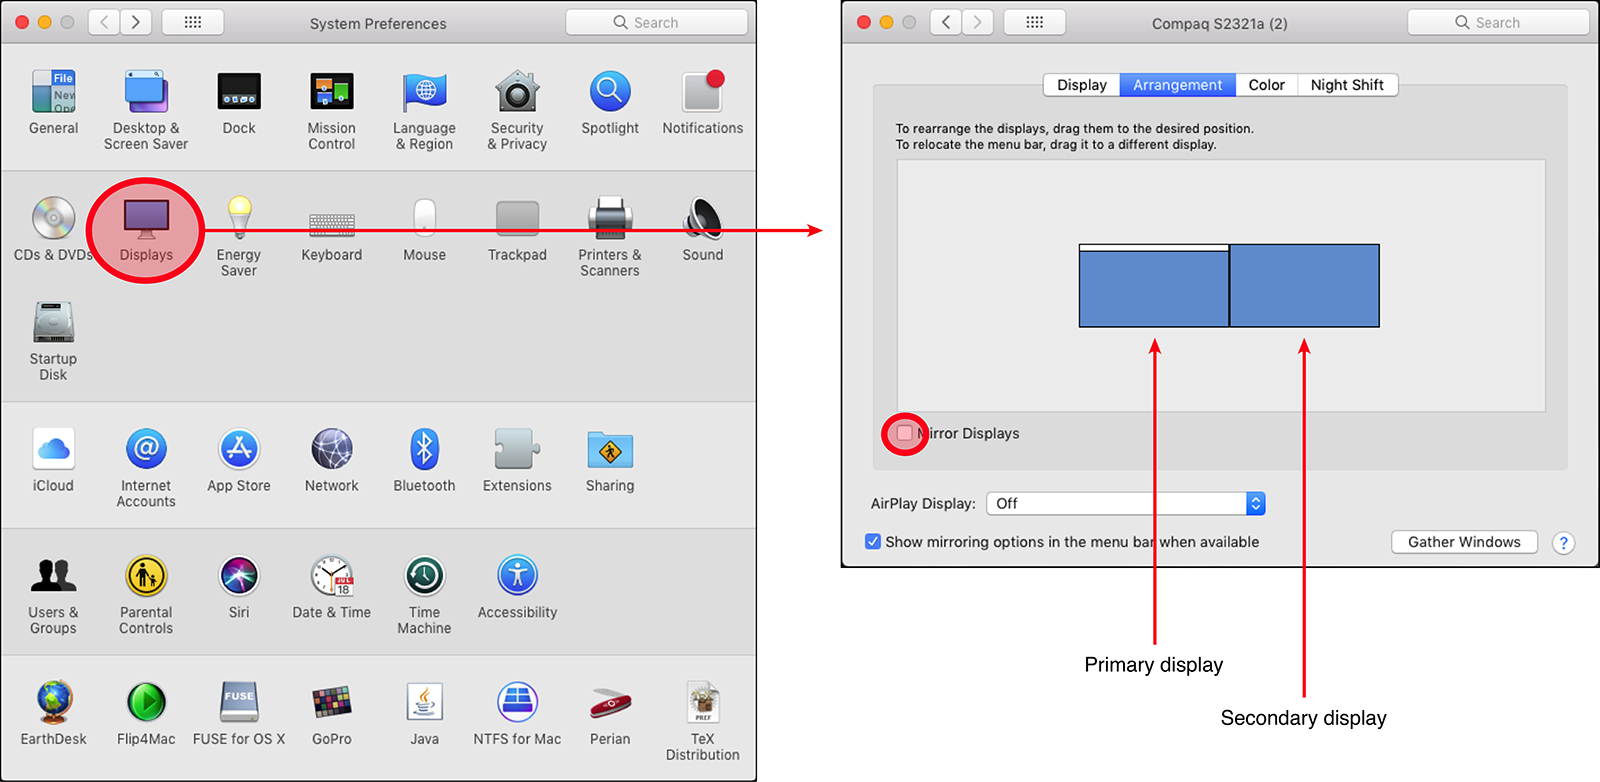
On more recent version of the MacOS the displays preferences look as follows. 
Note that in general the two displays will not be the same size. The secondary display will typically be either 1920x1080 or 1920x1200, the primary display will be whatever the laptop or iMac screen resolution is. Player controls
When the player application is run, two windows will be created. One window will be on the secondary display, it will be full screen and it is where the warped movie will play (on the data projector). The other window will appear on the primary display, it will not be full screen, it contains the movie controls and will appear as follows although the movie name and preview rectangle will obviously reflect other movies than the two examples shown here. 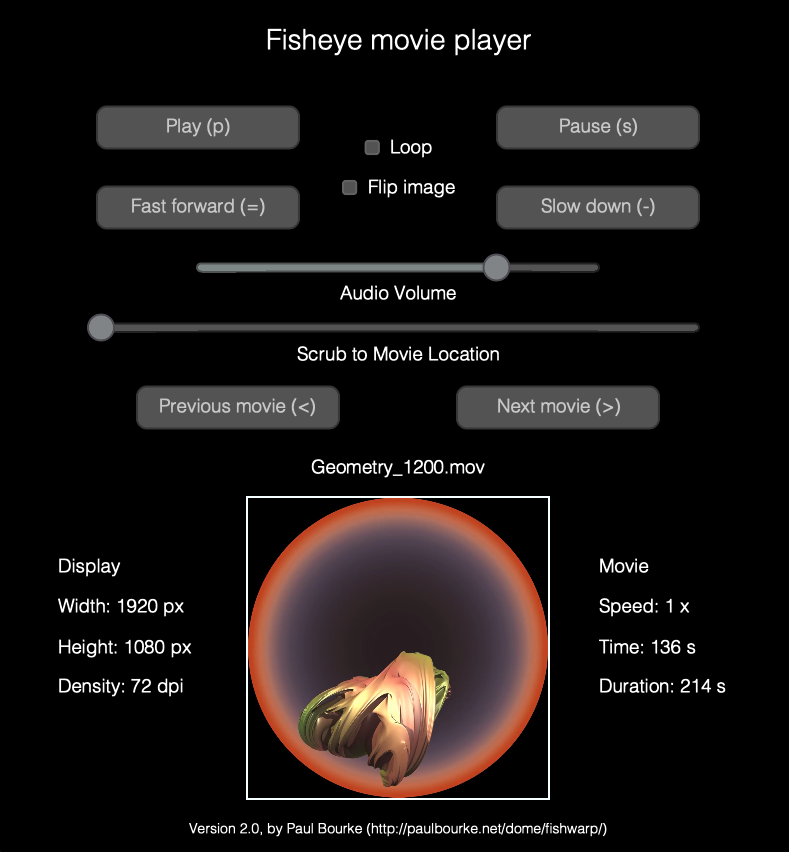
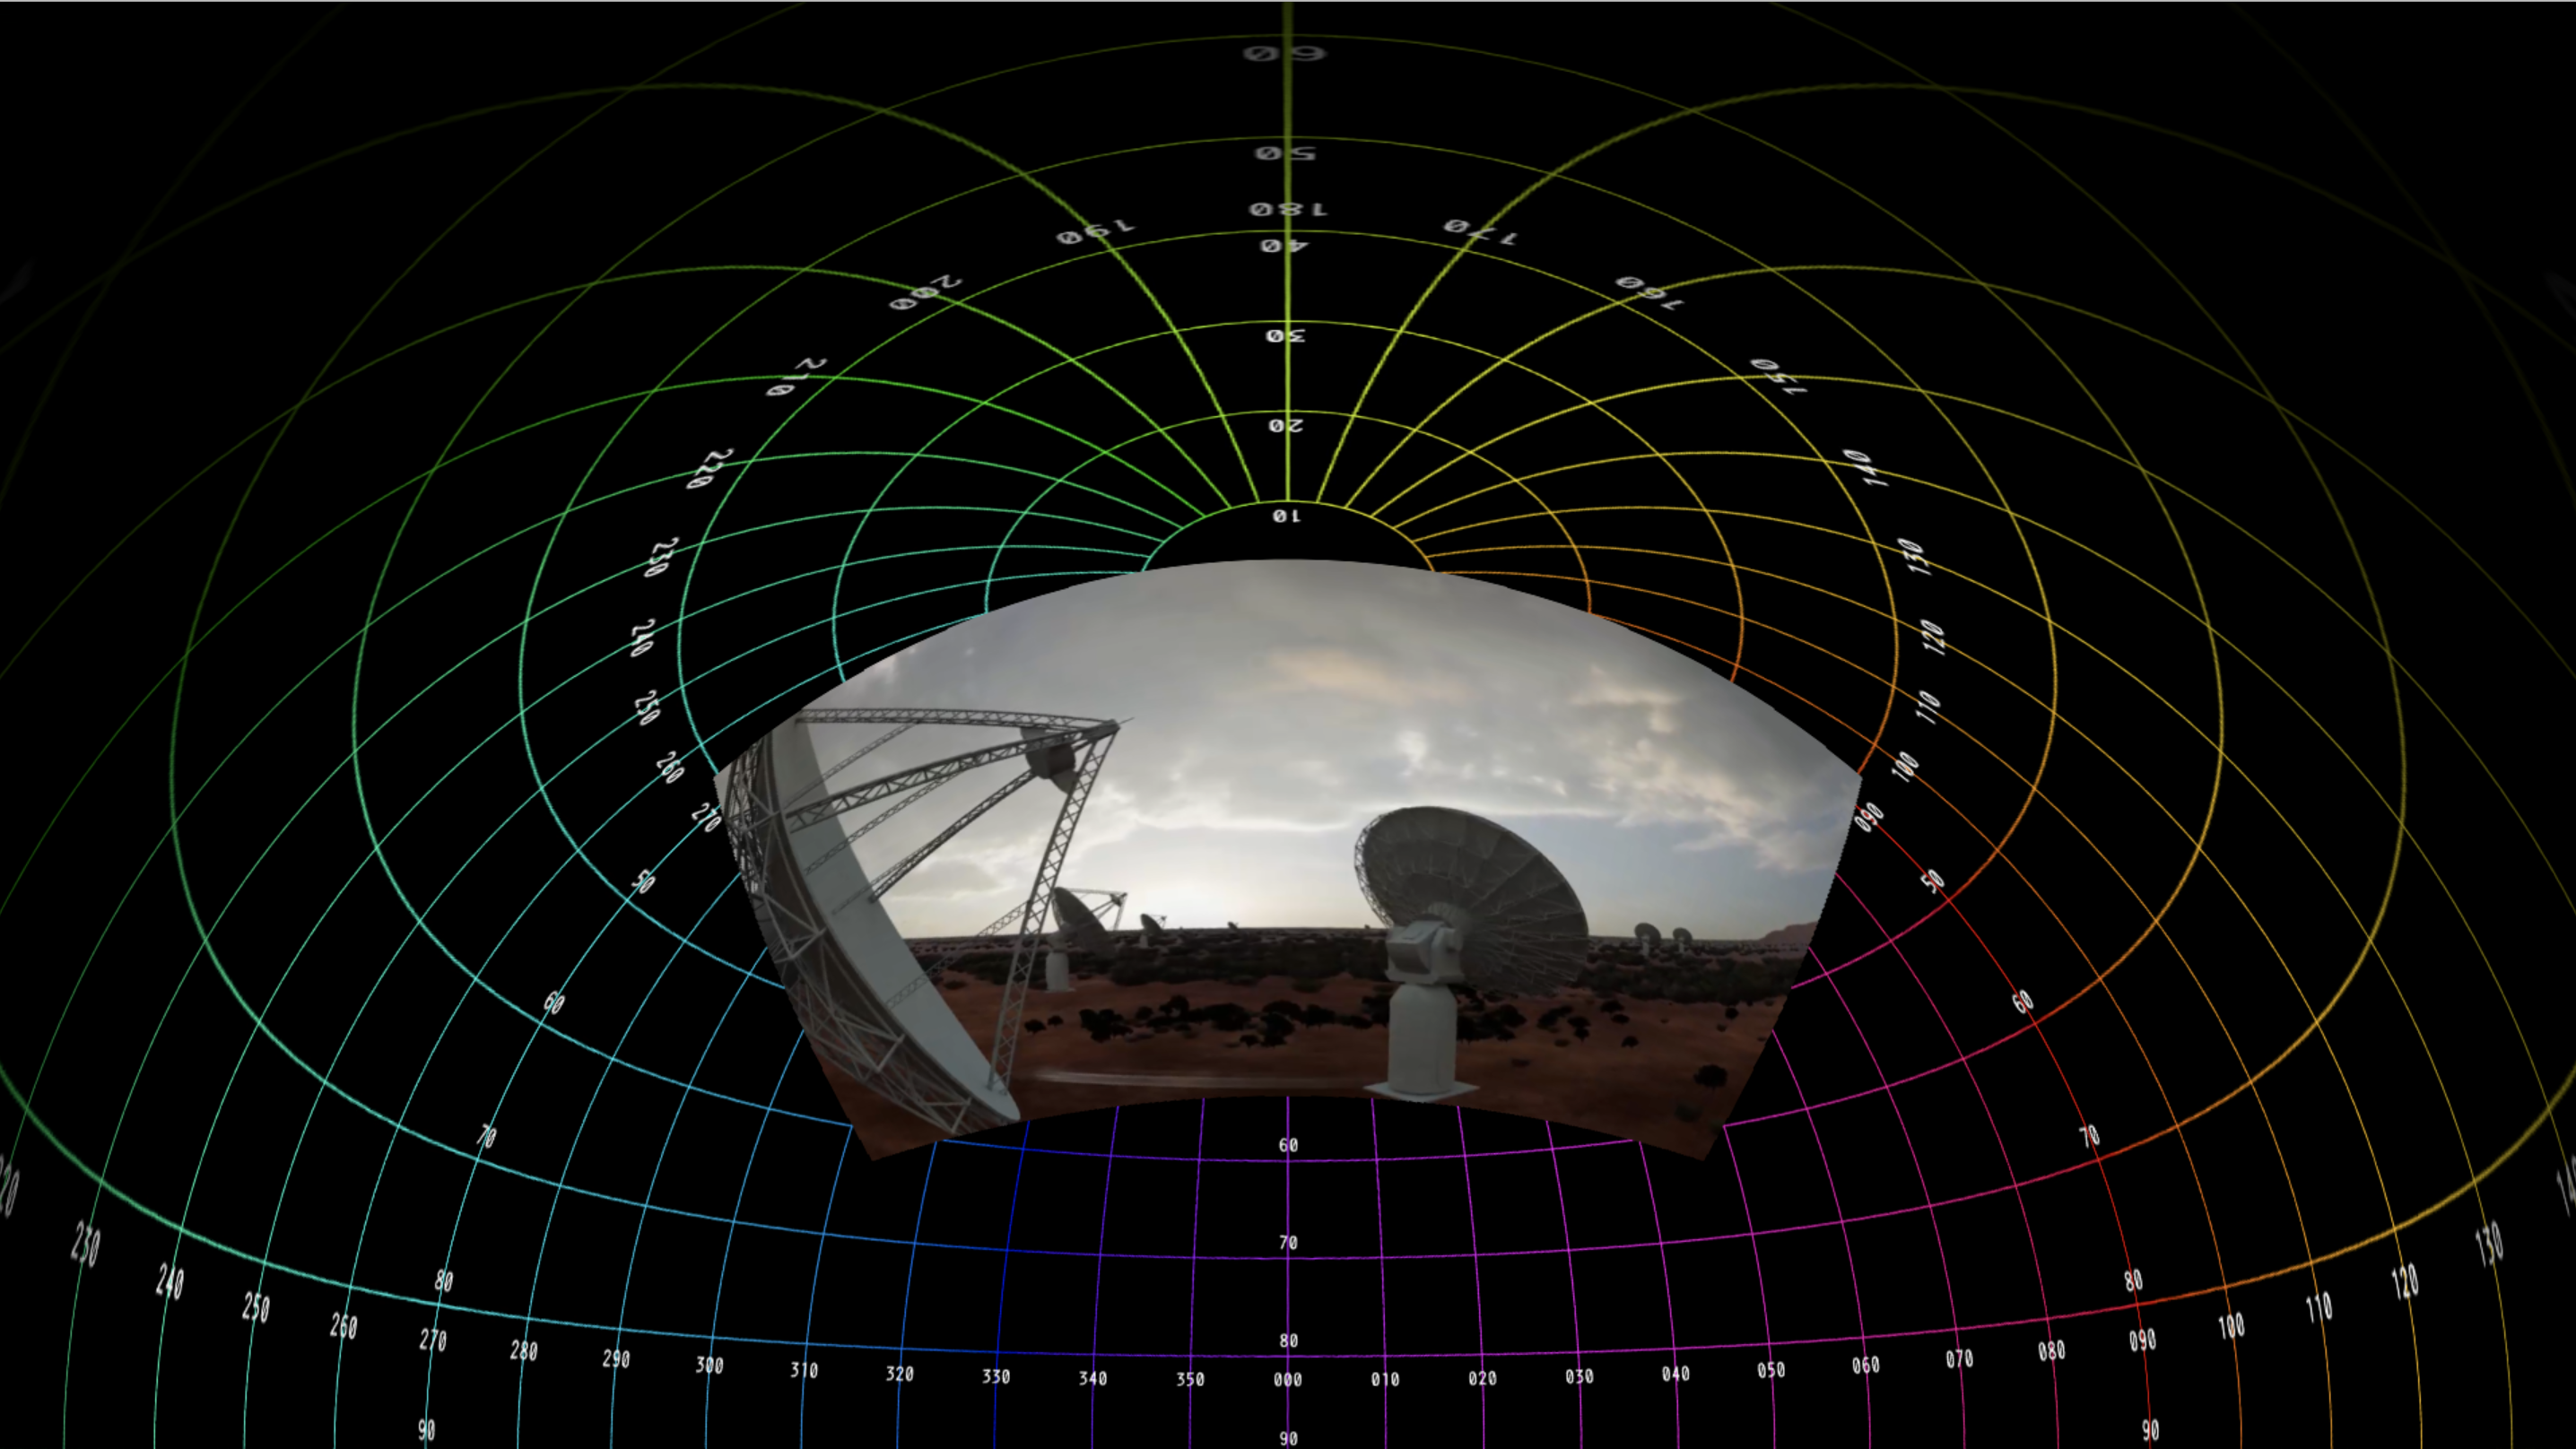
The meaning of the items on this window should be obvious. The fisheye movie is previewed in the lower rectangle, the image on the secondary display is the warped version of this. The sound volume slider shown is a multiplier on the system sound levels, so when the slider is all the way to the right then the system sound level will be in effect. When the slider is all the way to the left then there will be no audio. In this example, the image on the secondary display will appear as follows, namely the warped version of the fisheye movie. 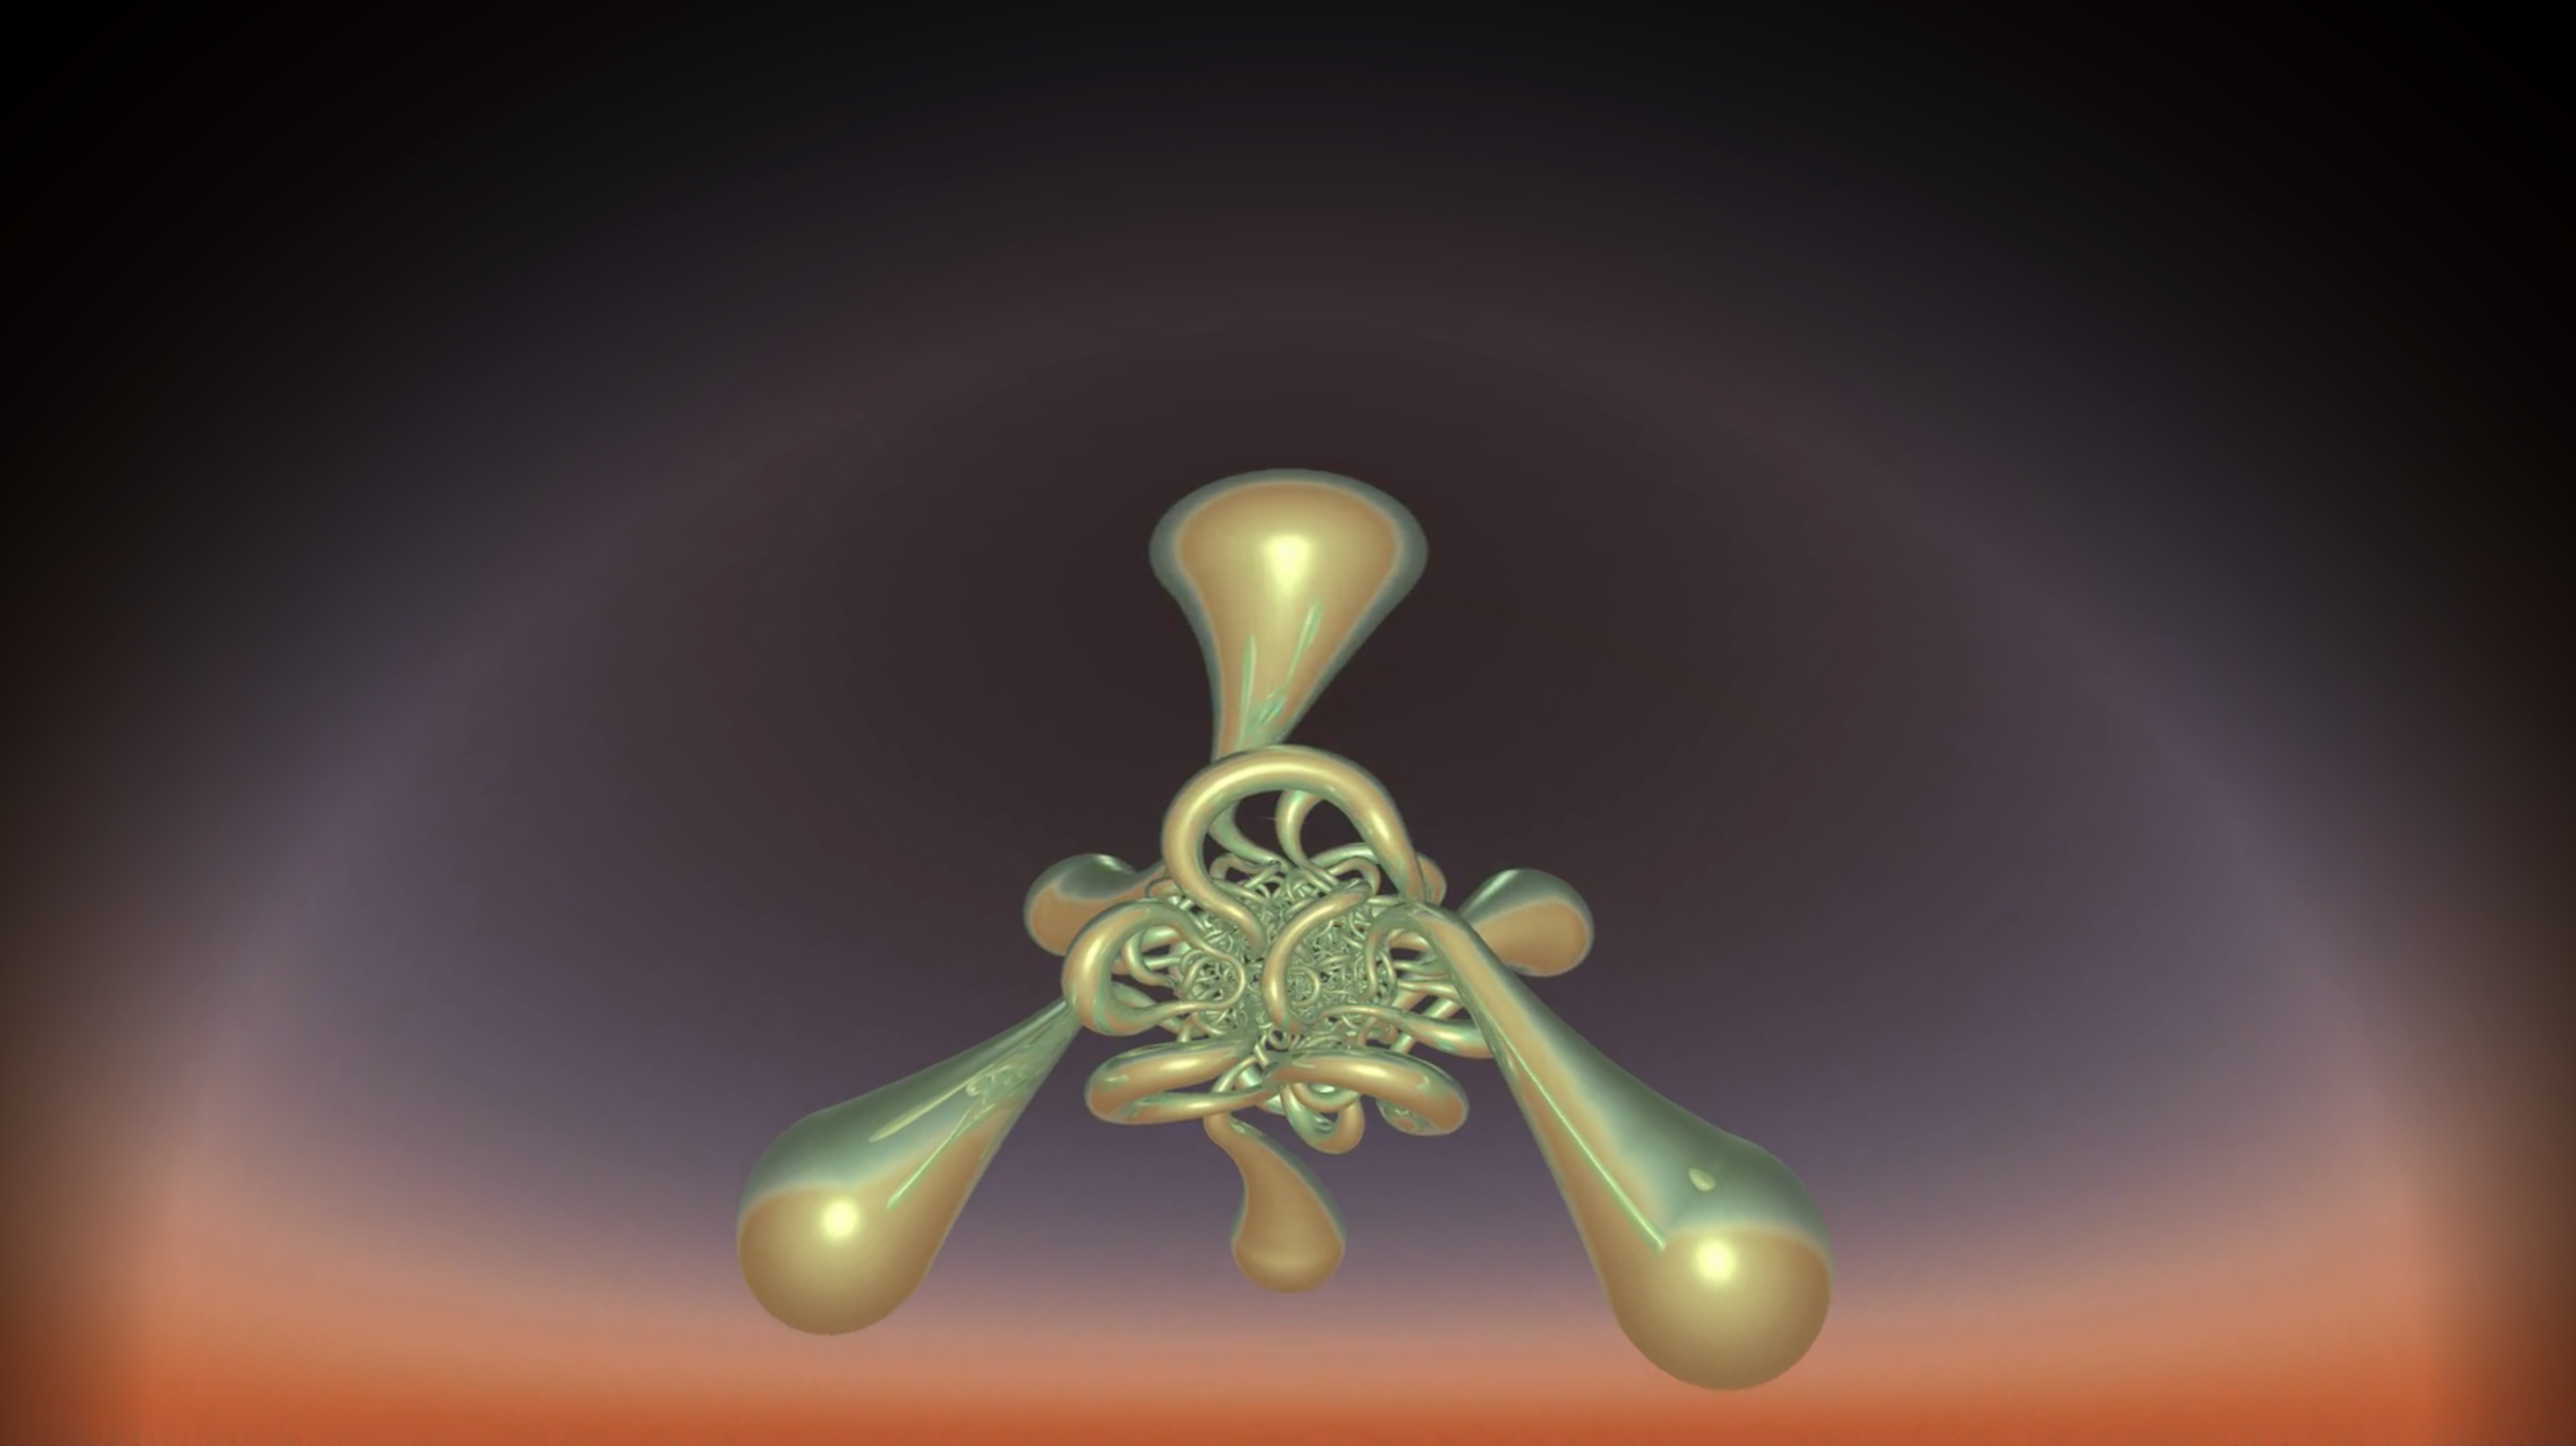
This approach of using the secondary display facilitates seamless presentations. That is, one can launch the different tools independently without the audience seeing anything strange occuring between them, for example: menus bars, other windows, etc. The control pane on the operators screen would normally be invisible to the audience. Warp Mesh
Any projection using a spherical mirror requires a description of how the fisheye is warped, such that after passing through the optical system (projector and mirror) the result on the dome looks correct. This is described by a mesh (vertices and texture coordinates) and stored in a so called warpmesh file. Ideally a warp mesh is created specifically for each installation since the warping required will depend on the exact geometry/optics. A tool for calibrating a particular installation is meshmapper and is provided with this application. Some installations find they can use a generic warpmesh and adjust the geometry/optics to match. Correct warping depends not on the resolution of the projector but only on the aspect ratio, the ratio of the width to height in pixels. 16x9 is suitable for projectors of resolution 3840x2160, 1920x1080 and 1280x720, although the later is not recommended by the author. The most common 16x10 aspect ratio is for projectors with a resolution of 3840x2400, 1920x1200 (UXGA+) and 2560x1600 (WQXGA). Other common data projection aspect ratios are 4x3 and 5x4, but these are not recommended for spherical mirror projection due to low pixel efficiency. It is imperative that the warp mesh used matches the aspect ratio the projector is being driven at. In order to use a site specific specific warping the warp mesh file should be named "warpmap.data" and placed in the package contents for the app. This is achieved by right mouse clicking (or control-click on laptop touch panels) on the application icon and choosing "Show Package Contents" from the pop-up menu, see below. 
The result, after expanding the Contents and Resources folders will look like the following, simply replace the warpmap.data file with the one designed for your particular set-up by the company you purchased the system from, or as a result of running the meshmapper calibration. Two standard 16:9 and 16:10 warp maps are included, simply rename the one that matches your projectors aspect ratio to "warpmap.data". 
Movies This fisheye movie player allows one to play any one of a number of movies. The movies that appear upon clicking the "Previous movie" and "Next movie" button are the ones found in the movies directory, also located in the Contents and Resources folder. To create your own playlist simply copy the movies you wish to play into that directory, as an example two short fisheye movies are supplied, see below. 
Navigation
Identical to the above except the movie is assumed to be prewarped. In reality such movies can be played with any movie player that supports full screen playback, this player is supplied in order to have a consistent interface with the other software here.
The following operates essentially the same as the above except in this case it accepts a 360 movie, as typically captured from one of the 360 movie cameras on the market. The format of the image is expected to be an equirectangular projection, 360 degrees of longitude and 180 degrees of latitude. The image should have a 2:1 aspect ratio, for example 
Instructions The following assumes the reader is familiar with the documentation above for the fisheye case, only the differences will be presented. The expected display settings are the same as for the above. Namely two displays, the secondary connected to the data projector. The player controls are very similar, except now the preview shows the full equirectangular frame instead of a fisheye. 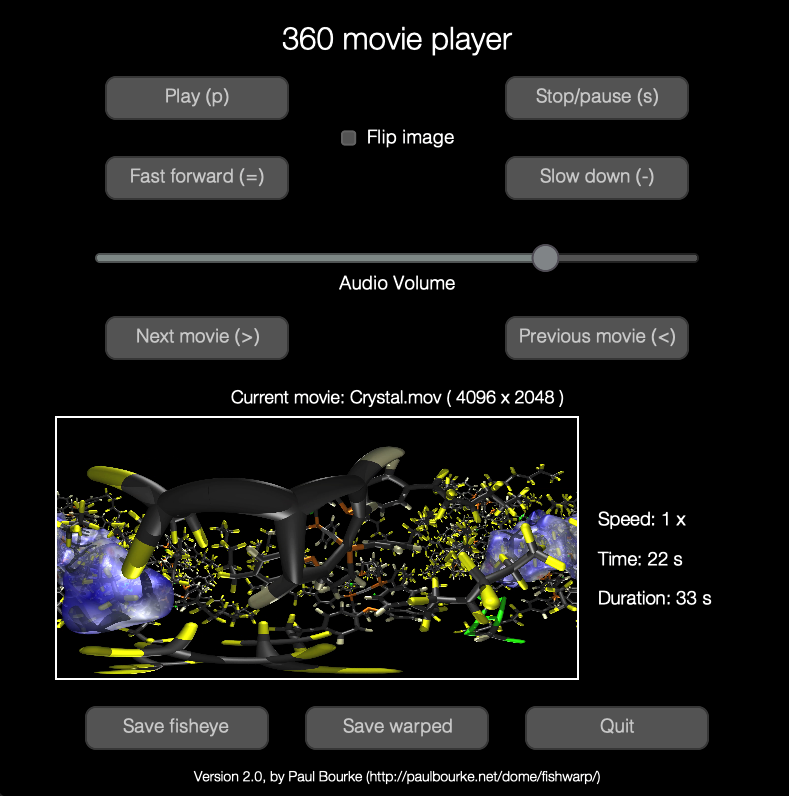
The 360 movie is previewed in the lower rectangle, the image on the secondary display is the warped version of an extracted fisheye view. See below for a description of how to interactively move this fisheye selection. In this example, the image on the secondary display will appear as follows. 
Movies are added to the play list by adding them to the "360video" directory, again located in the Package Contents for the application. Alternatively to temporarily add movies to the playlist they can be dragged onto the player controls window. 
Navigation
There are an infinite number of fisheyes that can be extracted from an equirectangular. The best can depend on the content and the orientation of the dome and/or seating. The arrow keys can be used to shift the fisheye view, the left and right arrows change the longitude, the up and down arrows change the latitude. Auto repeat is also supported for continuous movement. Alternatively one can shift the fisheye by holding the shift key and moving the mouse within the control window and while the control window is active. Note that fast movement can be disorientating, smooth gradual movement is recommended. Warning
360 movies can be much more compute/graphics demanding than fisheye movies. For one thing, for the same resolution they are twice the size. In addition to the warping required, which is the same as for the fisheye player, in this case the fisheye needs to be first extracted. As such, the computer power required for smooth playback may be more demanding.
The following operates essentially the same as the above except in this case it accepts a 360 image rather than movie. The format of the image is expected to be an equirectangular projection, 360 degrees of longitude and 180 degrees of latitude. The image should have a 2:1 aspect ratio. InstructionsThe following assumes the reader is familiar with the documentation above for the 360 movie case. The interface is simpler, as shown below. 
The 360 image is previewed in the lower rectangle, the image on the secondary display is the warped version of an extracted fisheye view. In this example, the image on the secondary display will appear as follows. 
Image slides are added to the play list by adding them to the "360images" directory, again located in the Package Contents for the application. Alternatively to temporarily add slides to the playlist they can be dragged onto the player controls window. 
Navigation
There are an infinite number of fisheyes that can be extracted from an equirectangular. The best can depend on the content and the orientation of the dome and/or seating. The arrow keys can be used to shift the fisheye view, the left and right arrows change the longitude, the up and down arrows change the latitude. Auto repeat is also supported for continuous movement. Note that fast movement can be disorientating, smooth gradual movement is recommended.
A version of the above 360 movie player is also provided for so called "VR" 360 movies. These movies are intended for stereoscopic viewing in VR headsets, the frame is split into two halves vertically. The equirectangular movie for one eye in the top half of the frame and the equirectangular movie for the other half is in the bottom half of the frame. This player otherwise operates identically to the 360 movie player described above. 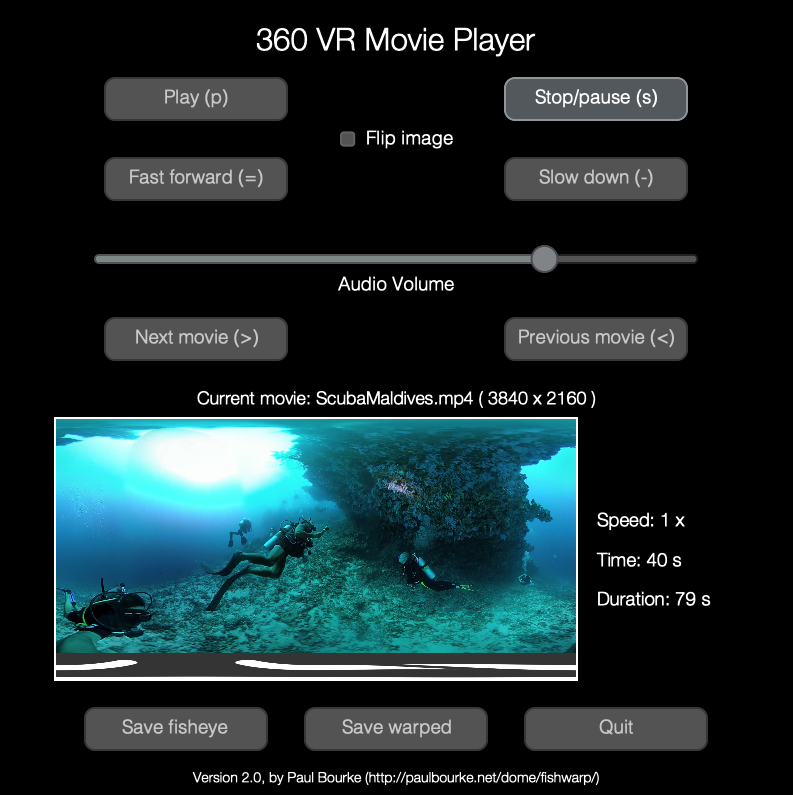
A version of the above 360 movie player is also provided for so called 360 movies downloaded from YouTube. These movies are stored as 6 equal angle cube maps arranged in a 3x2 grid, more information can be found here. This player otherwise operates identically to the 360 movie player described above.
The following is in the same style as the two players above except this expects to play a standard (non-fisheye) movie on a section of the dome. Conceptually the movie is playing on a plane that is tangential to the hemispherical dome surface, it is tilted at some angle and a certain distance away. InstructionsThe following assumes the reader is familiar with the documentation above for the fisheye case, only the differences will be presented. The expected display settings are the same as for the above. Namely two displays, the secondary connected to the data projector. The player controls are very similar to the previous players except now there are two additional sliders. One controls the angle of the movie plane above the spring line of the dome, the other controls the size of the movie and therefore how much of the dome it covers. 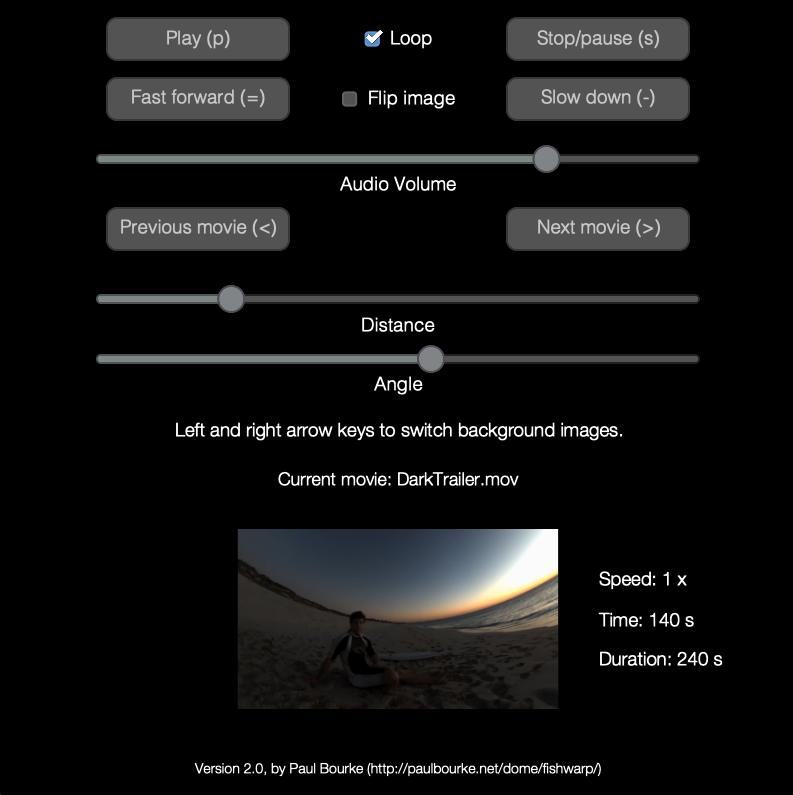
Two different angle and scale values are shown below. The first is lower on the dome, the second is higher on the dome and further away. 
Movies are added to the play list by adding them to the "videos" directory, again located in the Package Contents for the application. Alternatively to temporarily add movies to the playlist they can be dragged onto the player controls window. 
The background images can be found in the "backgrounds" directory in the package contents. The exact background can be chosen with the left and right arrow keys. Other backgrounds can be added, it is expected that they are square and fisheye projections. A version of the above standard video movie player is also provided that does not do any warping. This is intended for direct fisheye projection rather than spherical mirror systems. This player otherwise operates identically to the standard video movie player described above. 
The motivation of this utility is to put messages on the dome, warped correctly. These may be welcome messages, exit instructions, questionnaires, etc. The result can be saves to a image file and placed on the display background, or used with other fullscreen presentation software. The background image selection (should be a fisheye), the warp mesh file, and the text message can be customised by editing/replacing the corresponding files in the package contents. 
The current control pane looks as follows. The presenter can manually advance the slides or enable automatic mode and adjust the desired time before slides auto-advance. 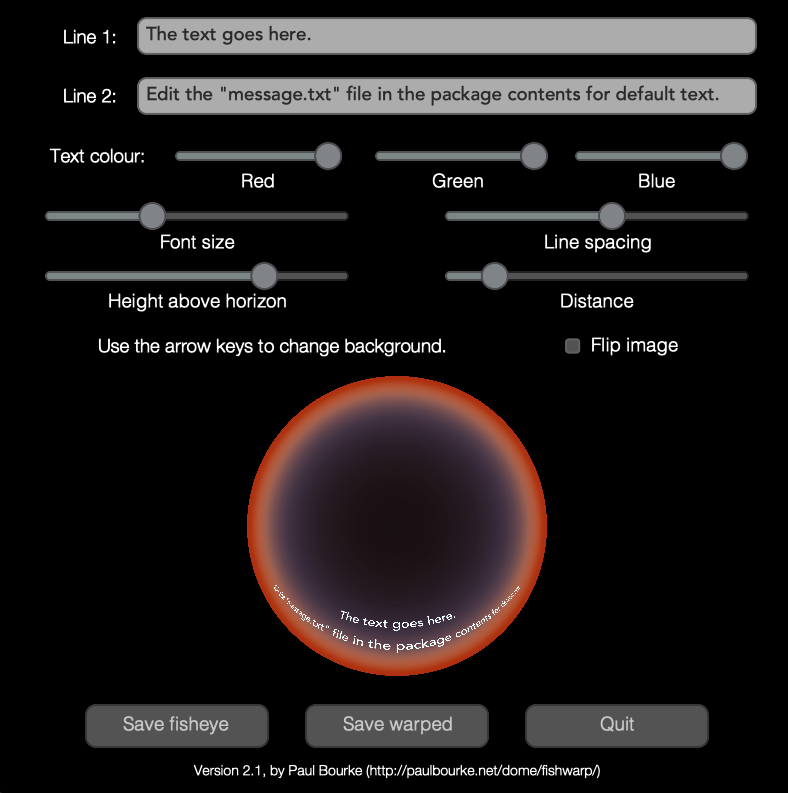
The output on the secondary display as follows. 
A version of the above is also provided that does not do any spherical mirror warping. This is intended for direct fisheye projection, the secondary display might look something like this. 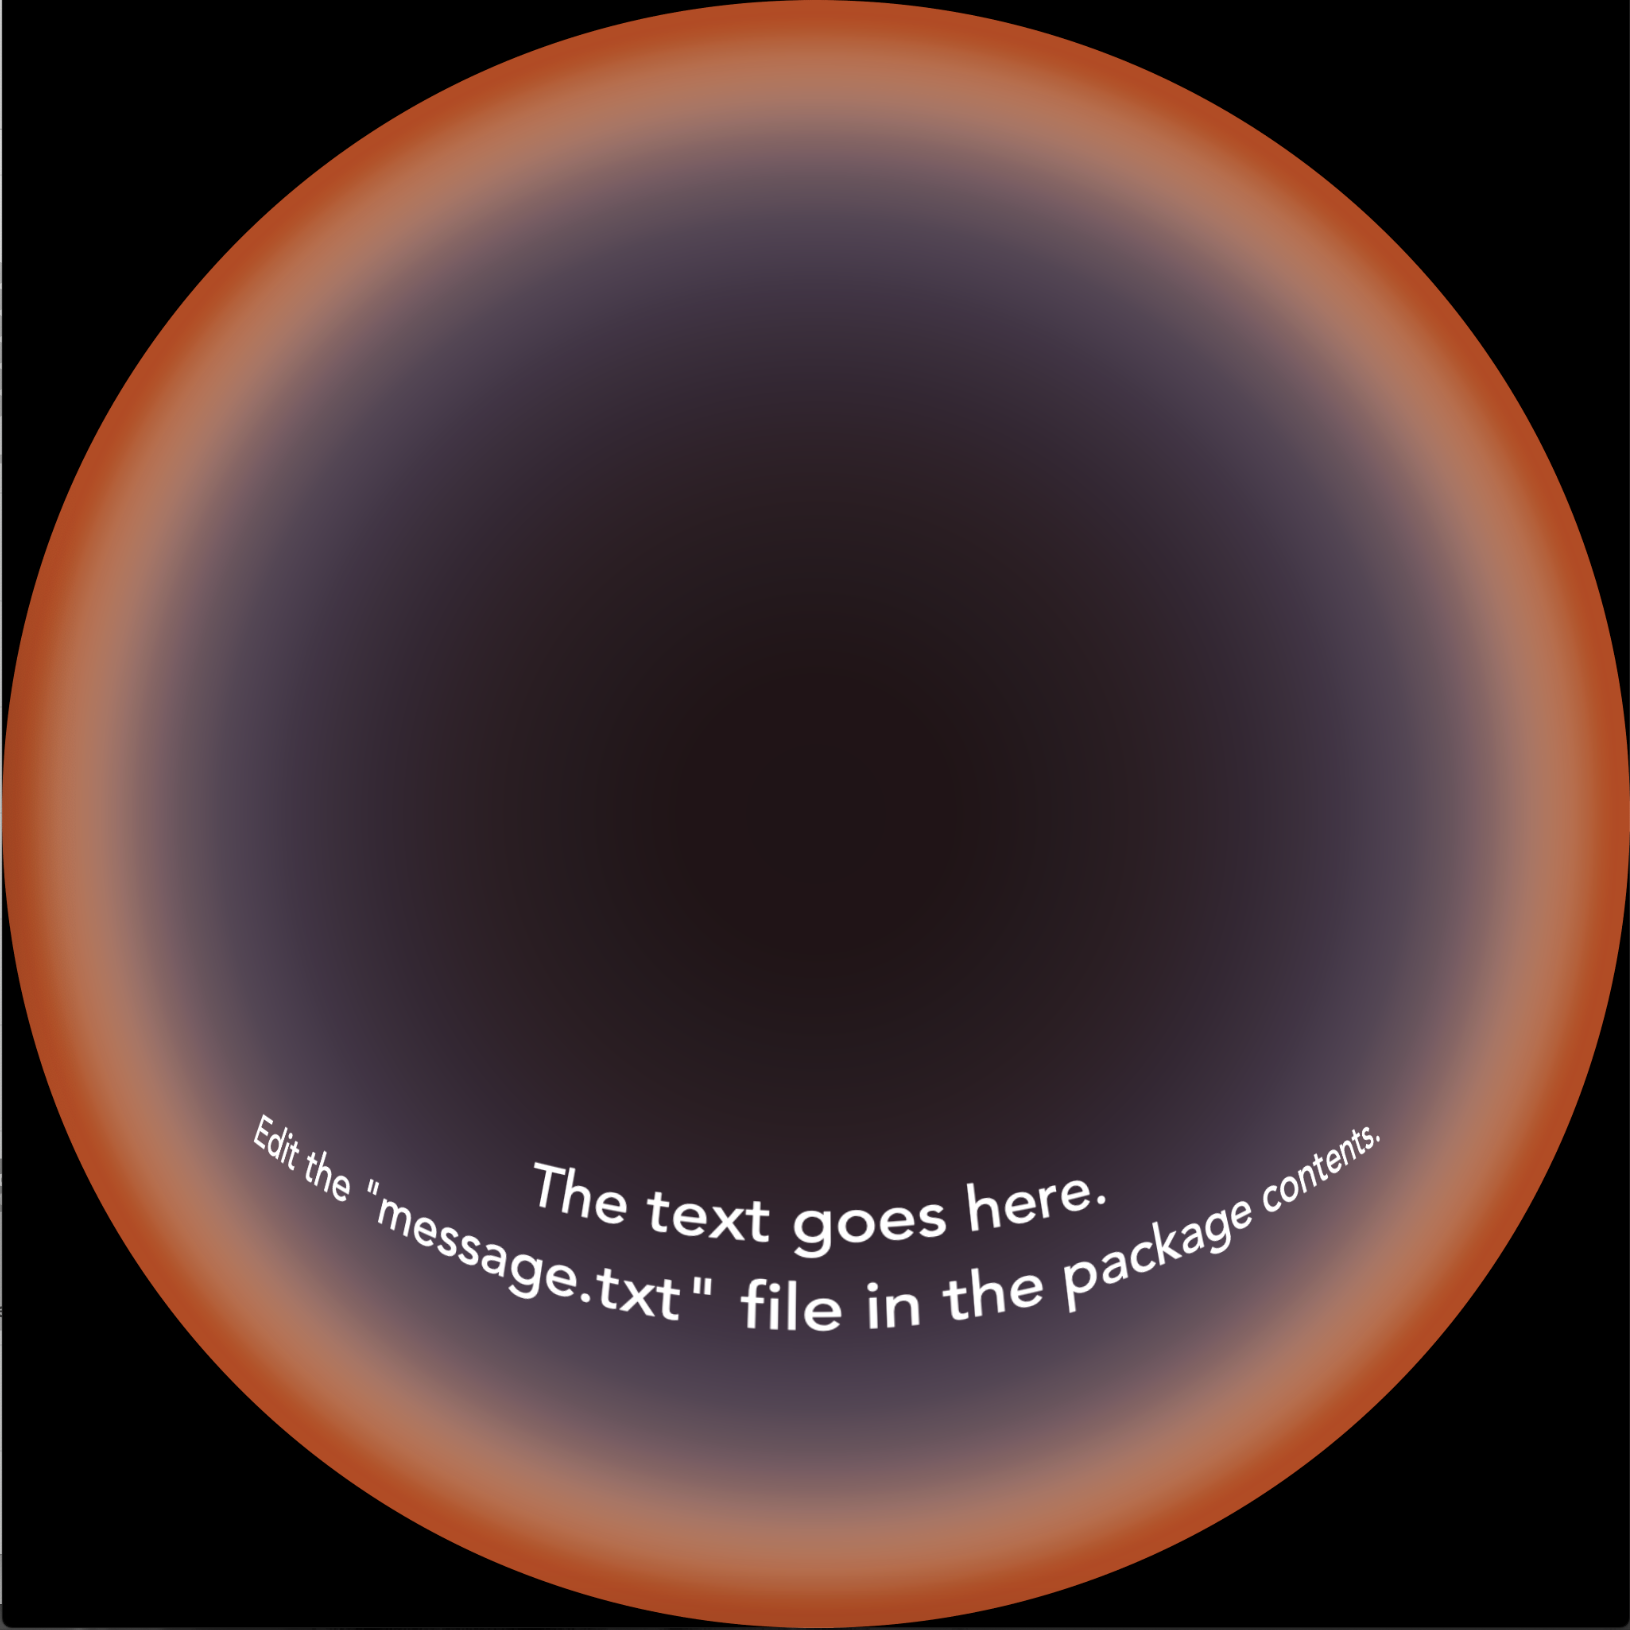
This software plays a slide show consisting of fisheye still images. The slide images and the warp mesh file can be customised by editing/replacing the corresponding files in the package contents. 
The current control pane looks as follows. The slide is placed on a pane a certain angle above the horizon and a certain distance away. As per the fisheye slide player the presenter can control the slide advance or enable automatic slide advance. 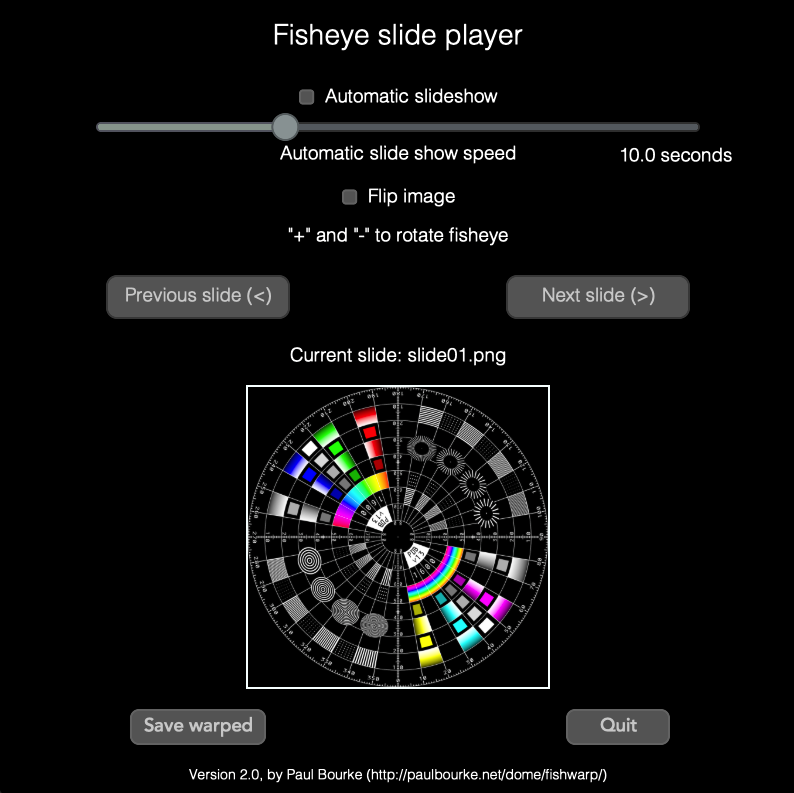
The output on the secondary display as follows. 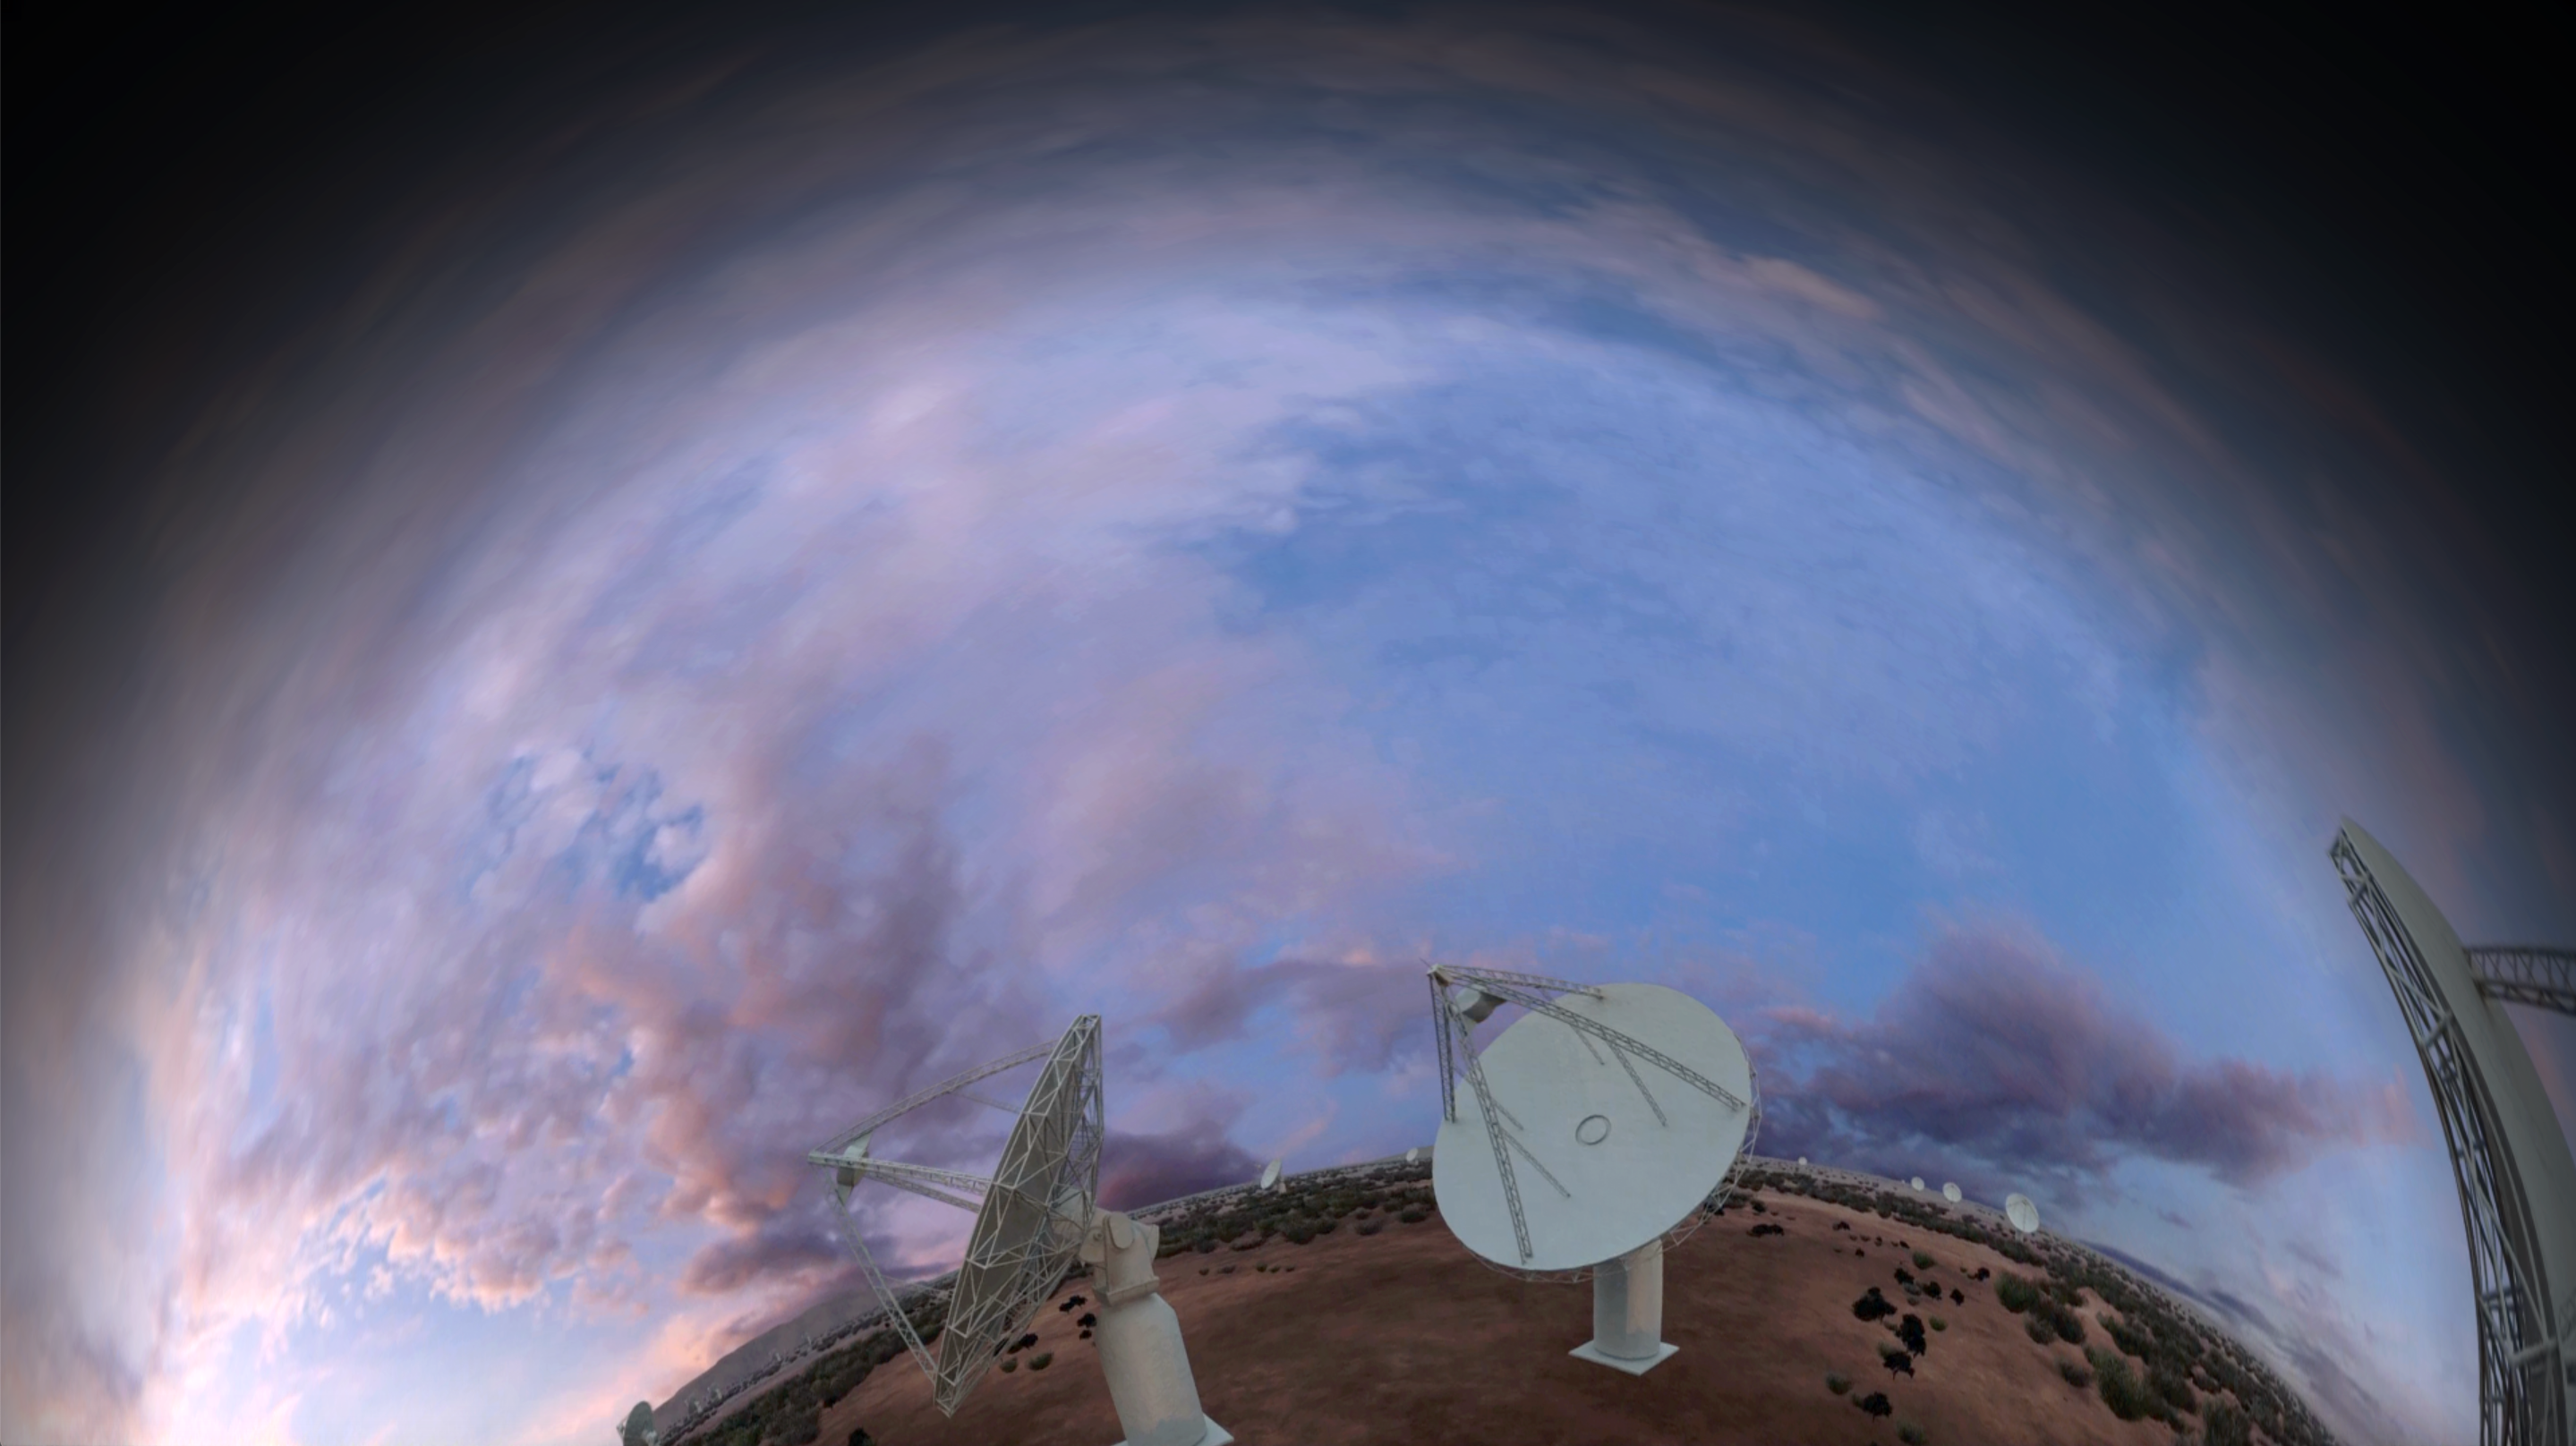
This software plays a slide show consisting of standard (non-fisheye) images, correctly warped for fisheye projection or spherical mirror projection. The slide images and the warp mesh file can be customised by editing/replacing the corresponding files in the package contents. 
The current control pane looks as follows. 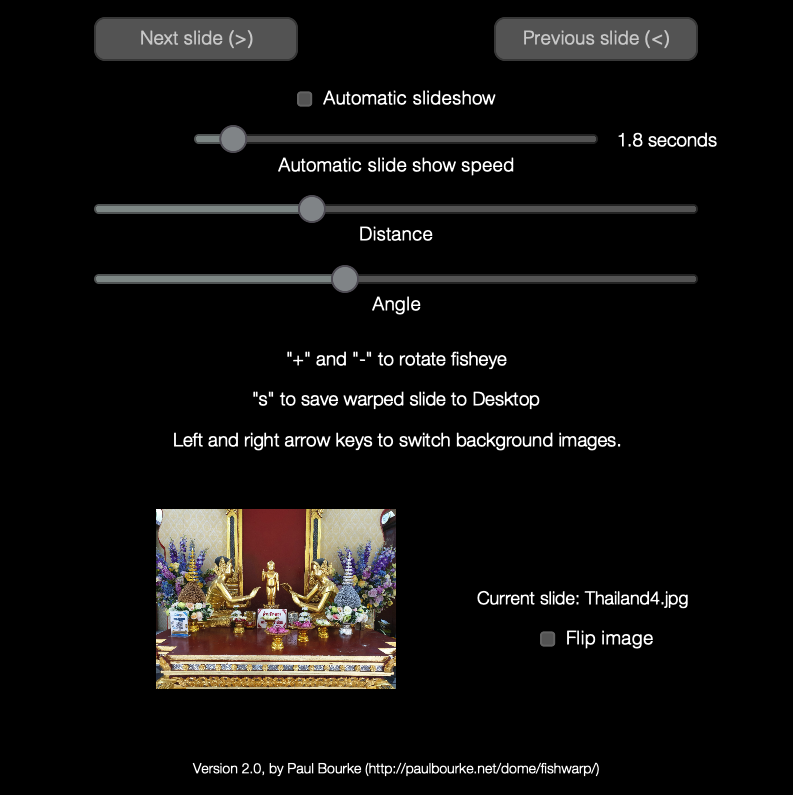
The output on the secondary display as follows. 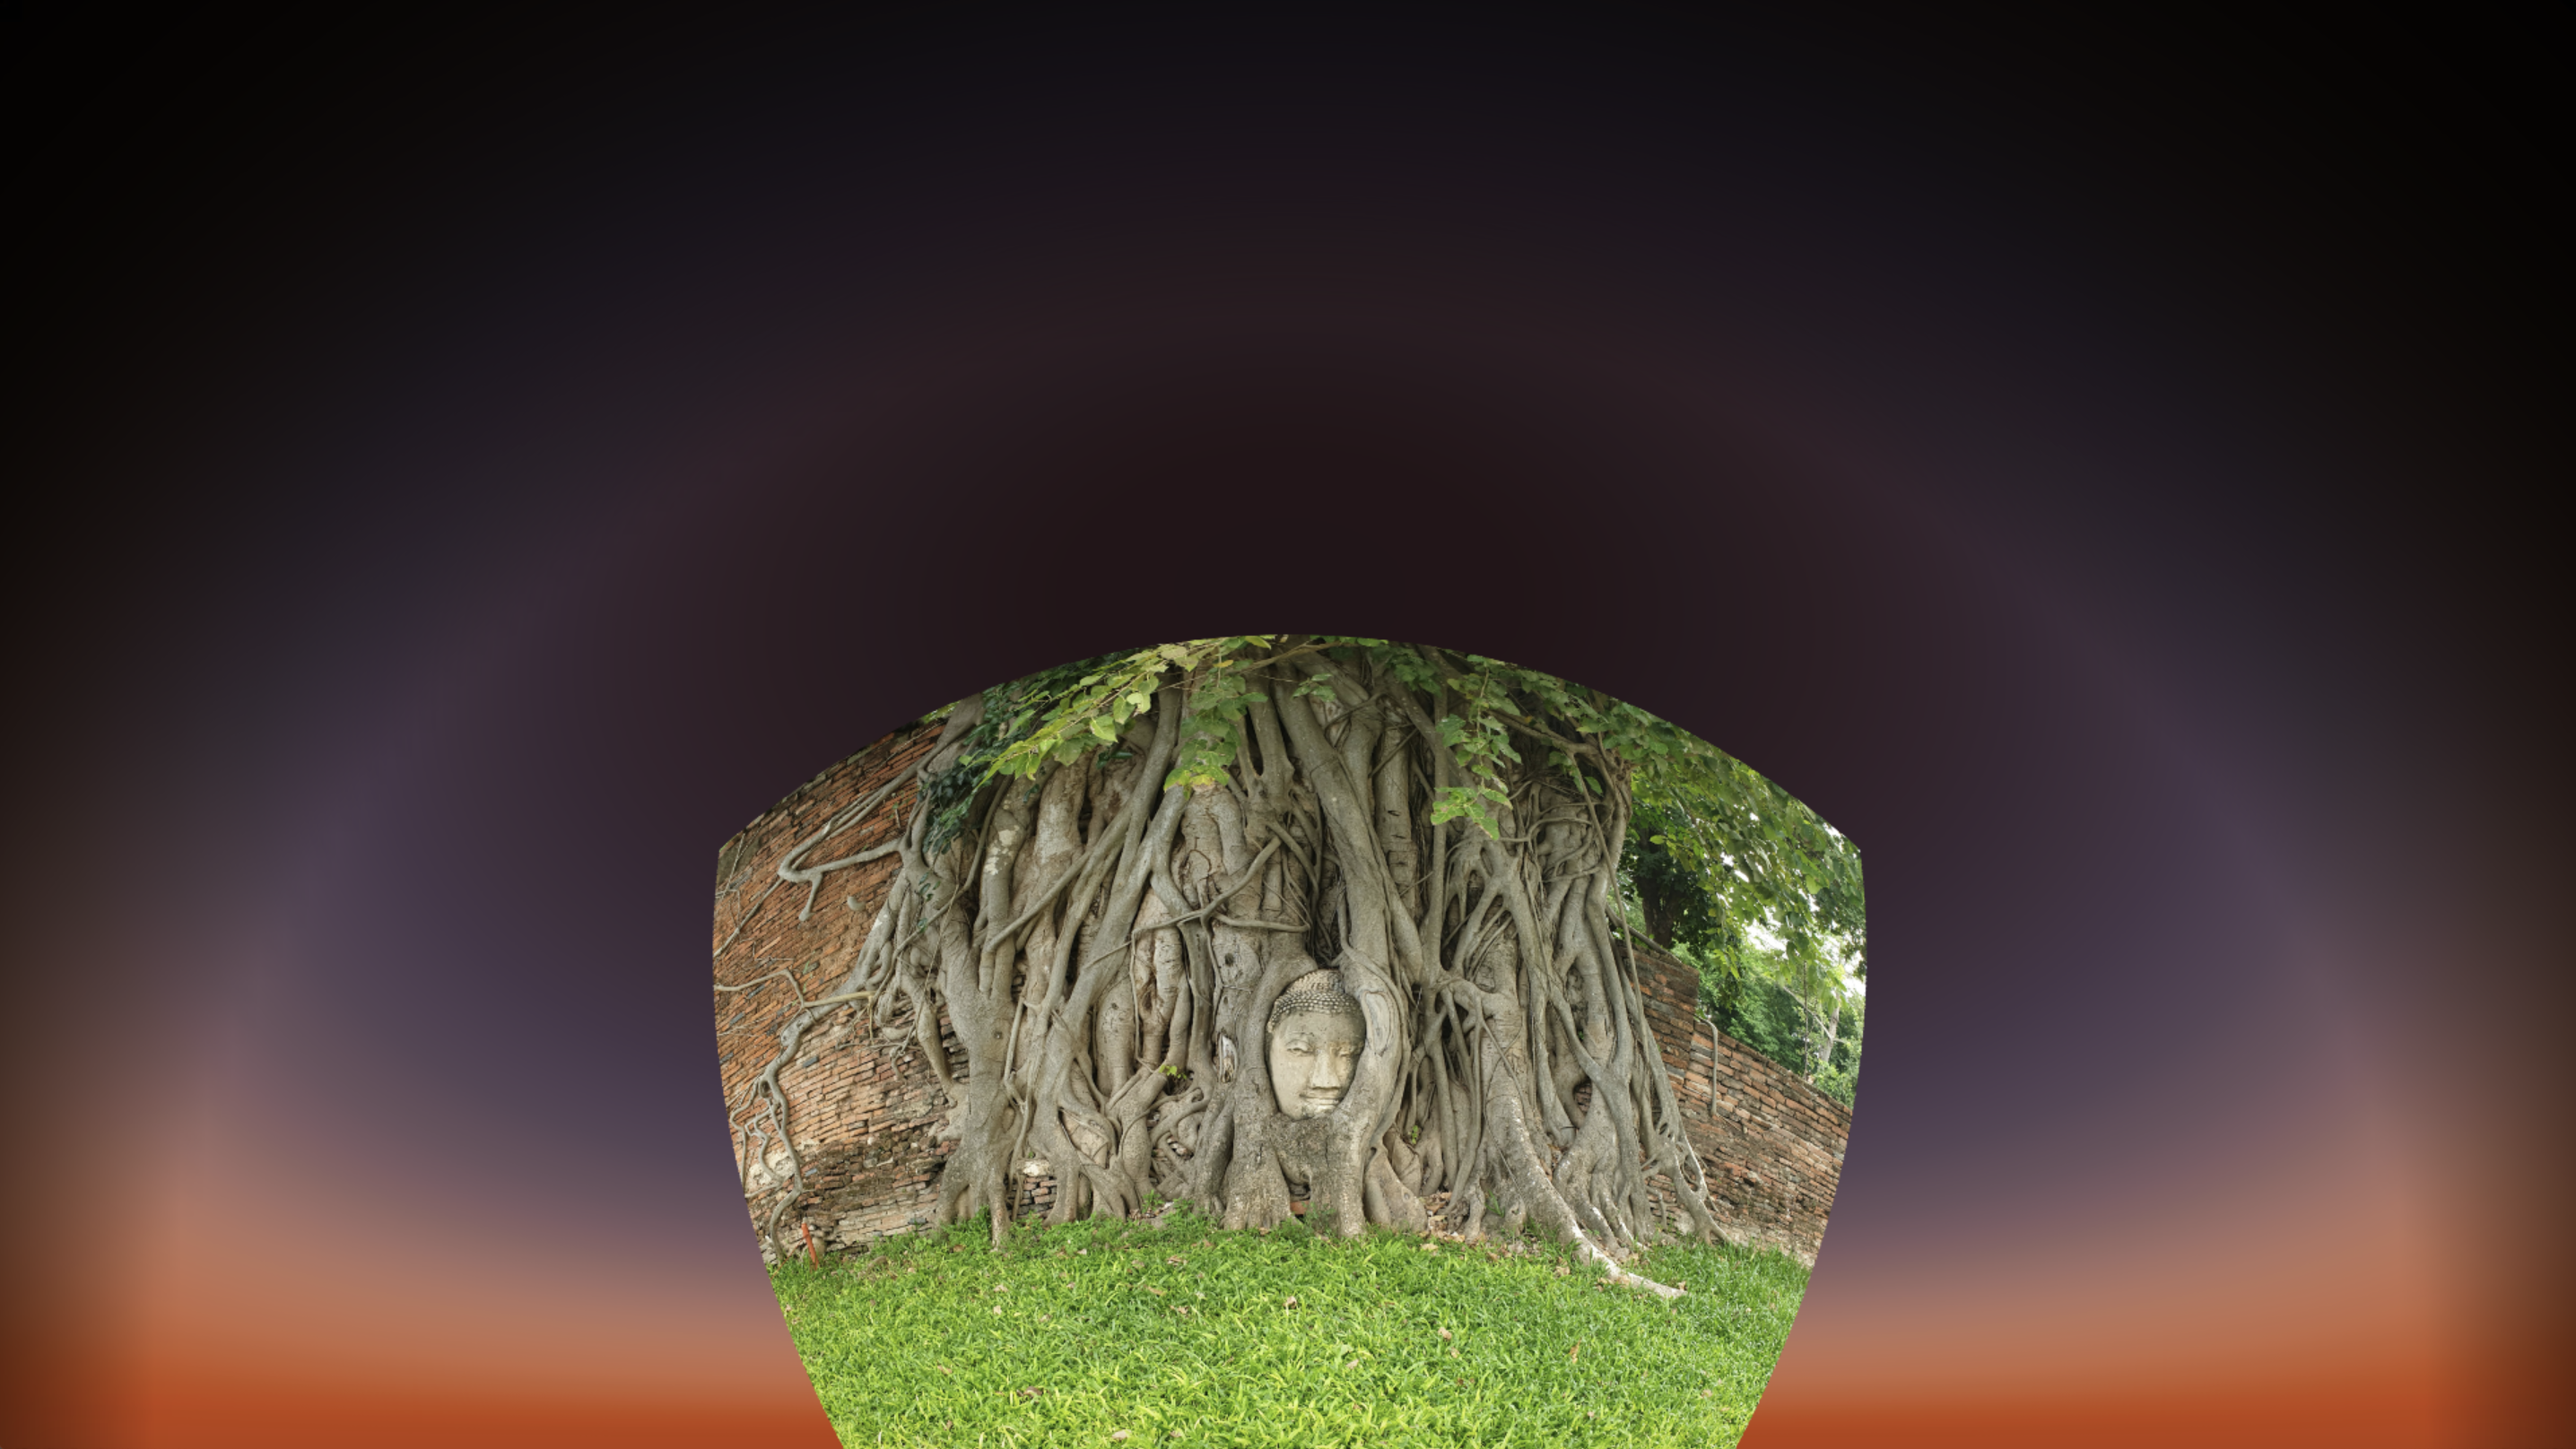
Secondary display example for a fisheye projection system. 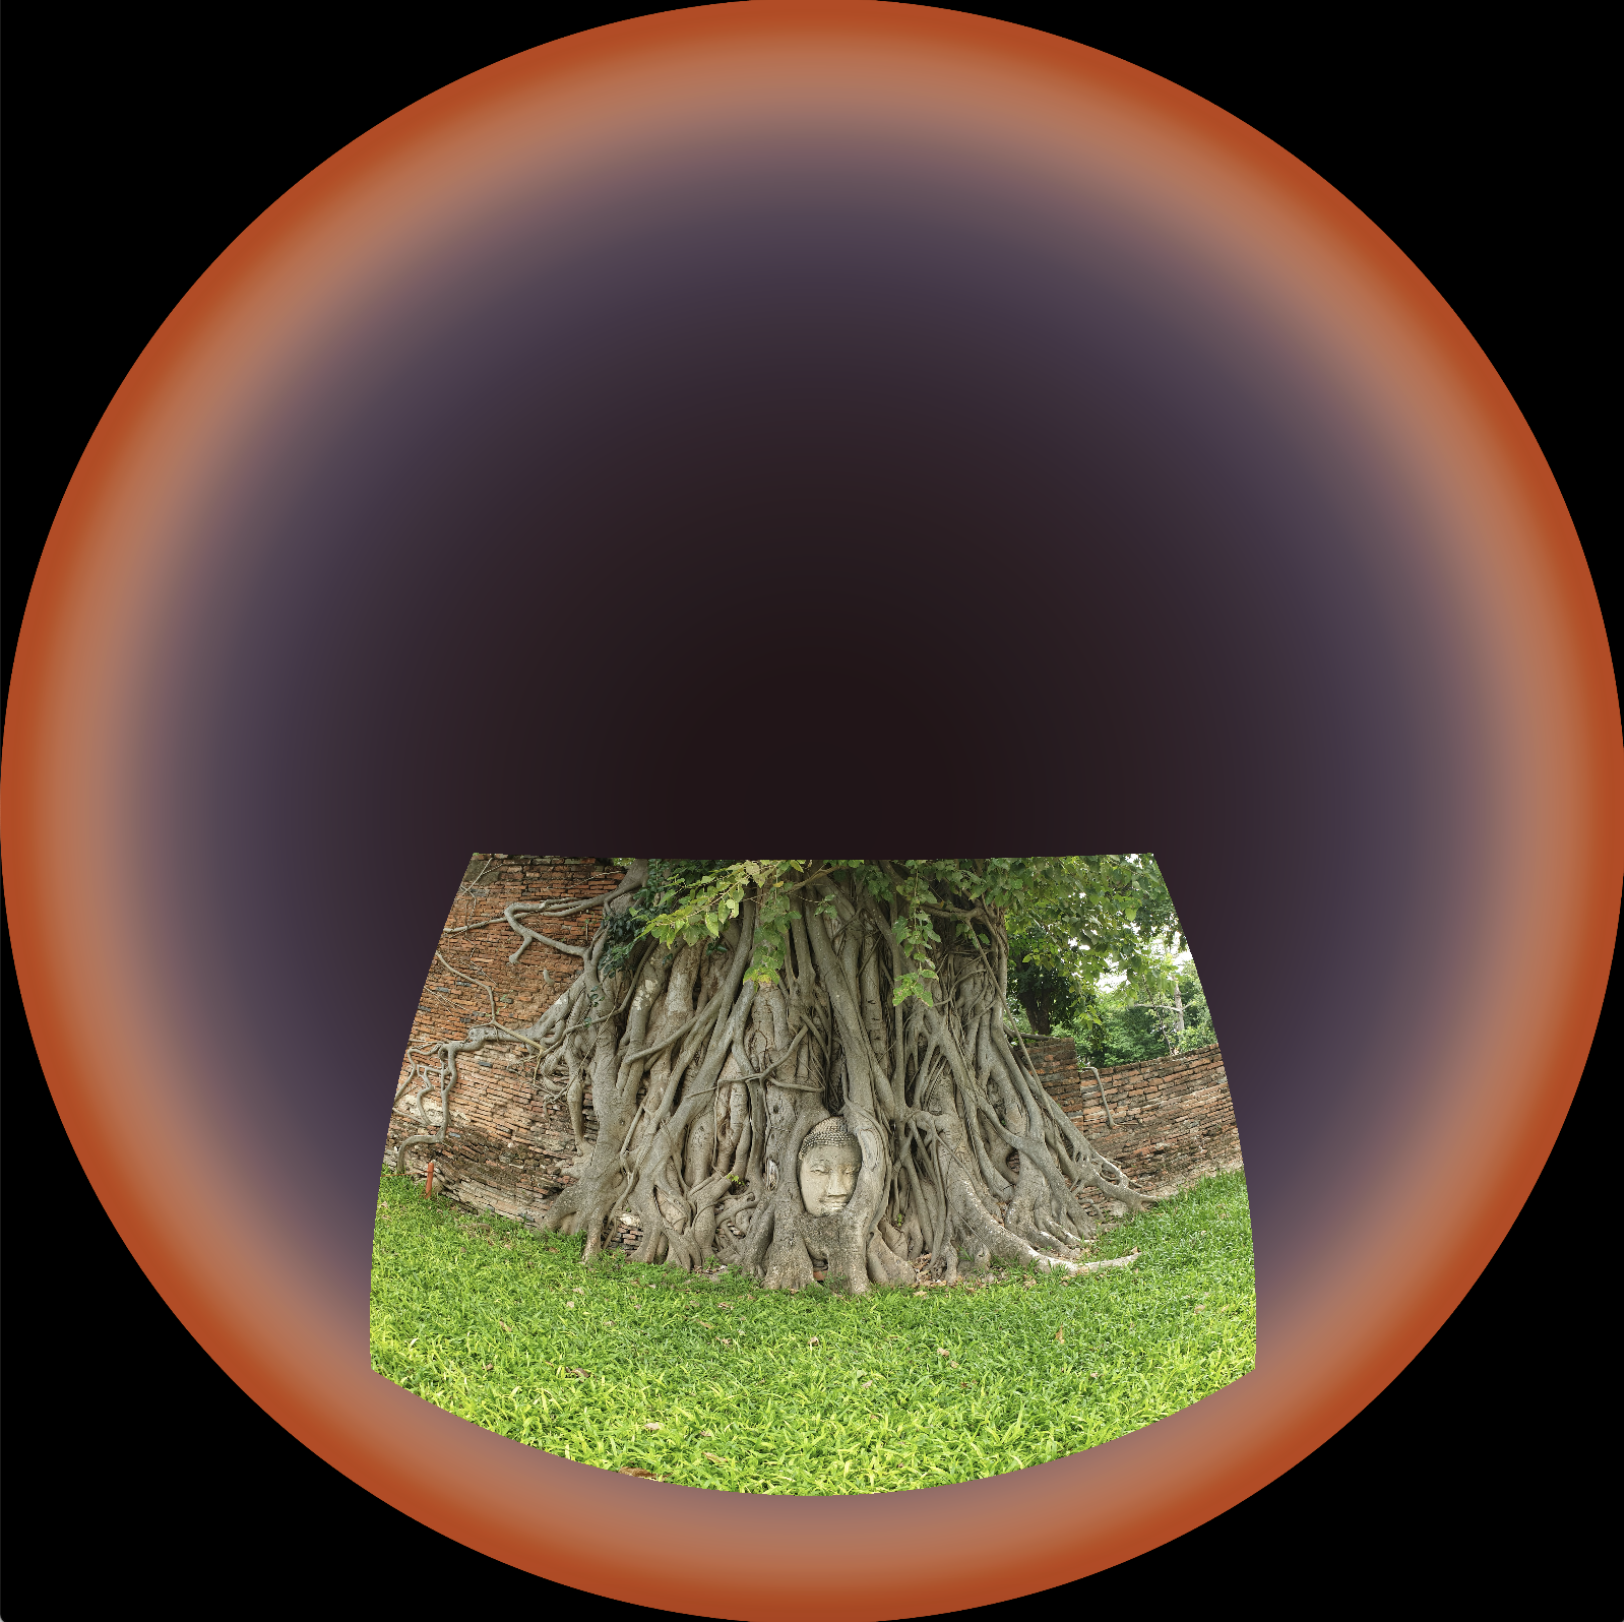
For fisheye projection the image on the dome only looks correct if the fisheye lens is in the center of the dome. On occassion the projector may not be in the center, two common ones are: it may be desirable to place a viewer at the center of the dome, there may be something else located at the center such as a dedicated star projector. As per the above, fisheye movies can be added to the package contents. In addition the default x and y offset can be specified in the config.txt file. 
The current control pane looks as follows. At the time of writing only offsets in a plane parallel to the spring line of the dome are supported. For more general offaxis warping see: Dome Projection and Calibration for Offaxis Fisheye Lenses. 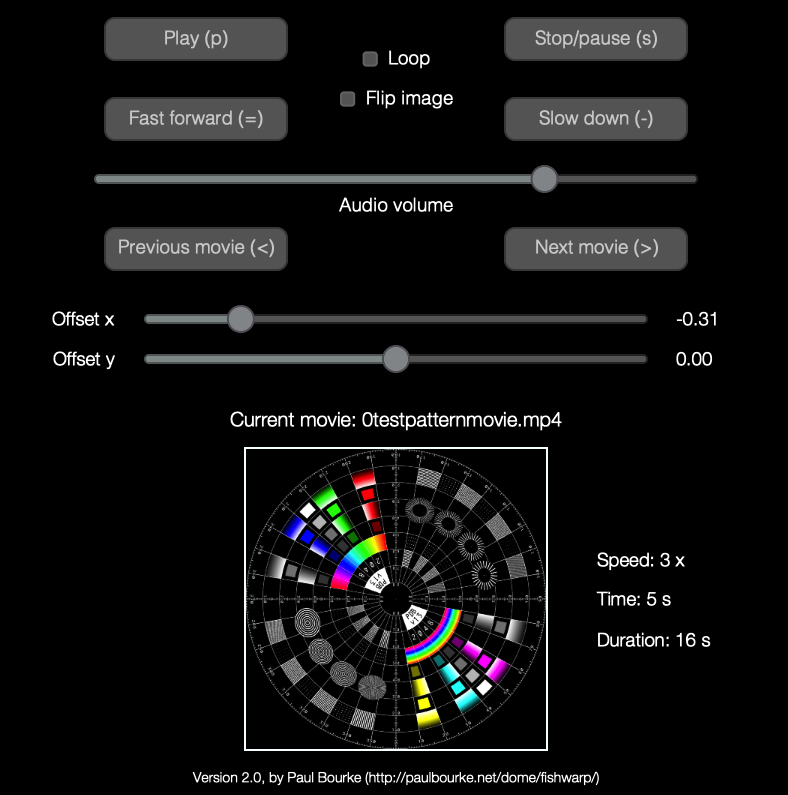
The output on the secondary display as follows. 
Screen Warp provides warping for spherical mirror projection systems in the case where the application supports a 180 degree fisheye projection but does not in itself support warping. Examples include SkySafari Pro (it will be used here as an example), Celestia and Stellarium. Note that while Stellarium does provide some support for warping, but it is incomplete and if there is a custom warp mesh already for the hardware configuration being used then it can be used here. The solution here expects a computer with two displays, for example, a laptop connected to the data projector. The software creating the fisheye should be run on the primary display (the display with the menu bar). The warped output will appear on the secondary display (the projected display). That is, the displays should NOT be mirrored. As one comes to expect these days, the first time the software is launched Apples security system may kick in, in this case it requires permission for the application to capture the screen. 
After giving permission one will be promoted to "quit and relaunch" or for the permission to be granted "later". The automatic quit and relaunch does not seem reliable, the "later" option is recommended along with a manual quit and application relaunch. 
There are two files that one will need to adjust, they can both be found in the package contents of the application. To access the package contents right click on the screenwarp application and choose "Show package contents". See below. 
One of the files is the warpmap, if there is a custom calibrated warp mesh for the system (eg: from meshmapper) then it should be renamed to "warpmap.data" and replace the one supplied. The second file defines the square area representing the fisheye image to be captured and warped. This file is just a text file consisting of three numbers. The first two define the top-left coordinates of the square, the third number represents the width (and height) of the square. For example, the following square has top left corner at (512,90) pixels and 945 pixels wide, and tall. 512 90 945 There are many ways one might determine these values. The approach used here is to do a full screen capture (clover-shift-3 on current MacOS). The resulting png file can be opened in any image editor (PhotoShop used here) and the coordinates of the top left corner along with the width determined. 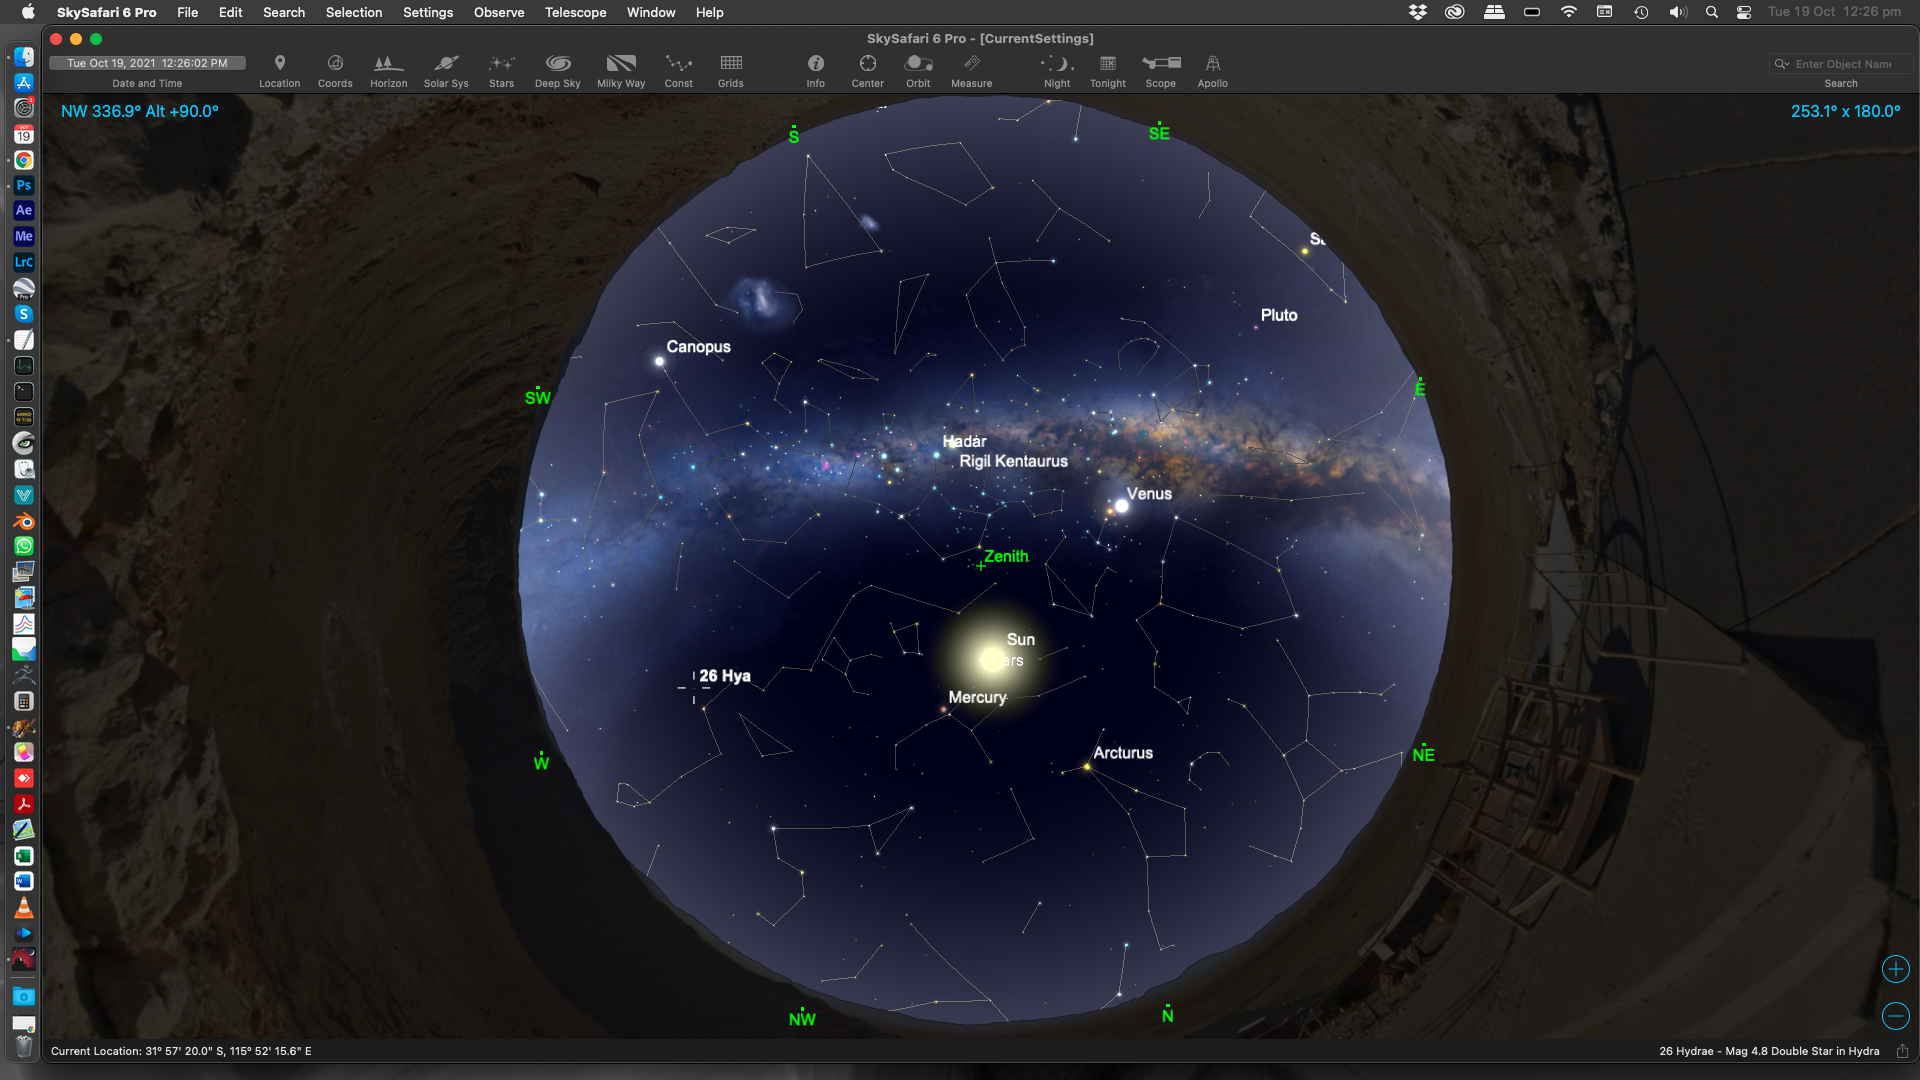

Important note for retina displays. The above coordinates are in pixels not points. If a retina display is being used the above process will most likely result in values 2x what the pixel values should be. One way to verify the correct values is to use clover-shift-4 which is normally used to capture a rectangular portion of the screen. The values displayed next to the small cross hairs are the pixel values. In order to facilitate this process a test application is supplied which will show the fisheye and warped fisheye in two small windows, this test can be performed with just a single display without the projector attached. It will look something like the following. 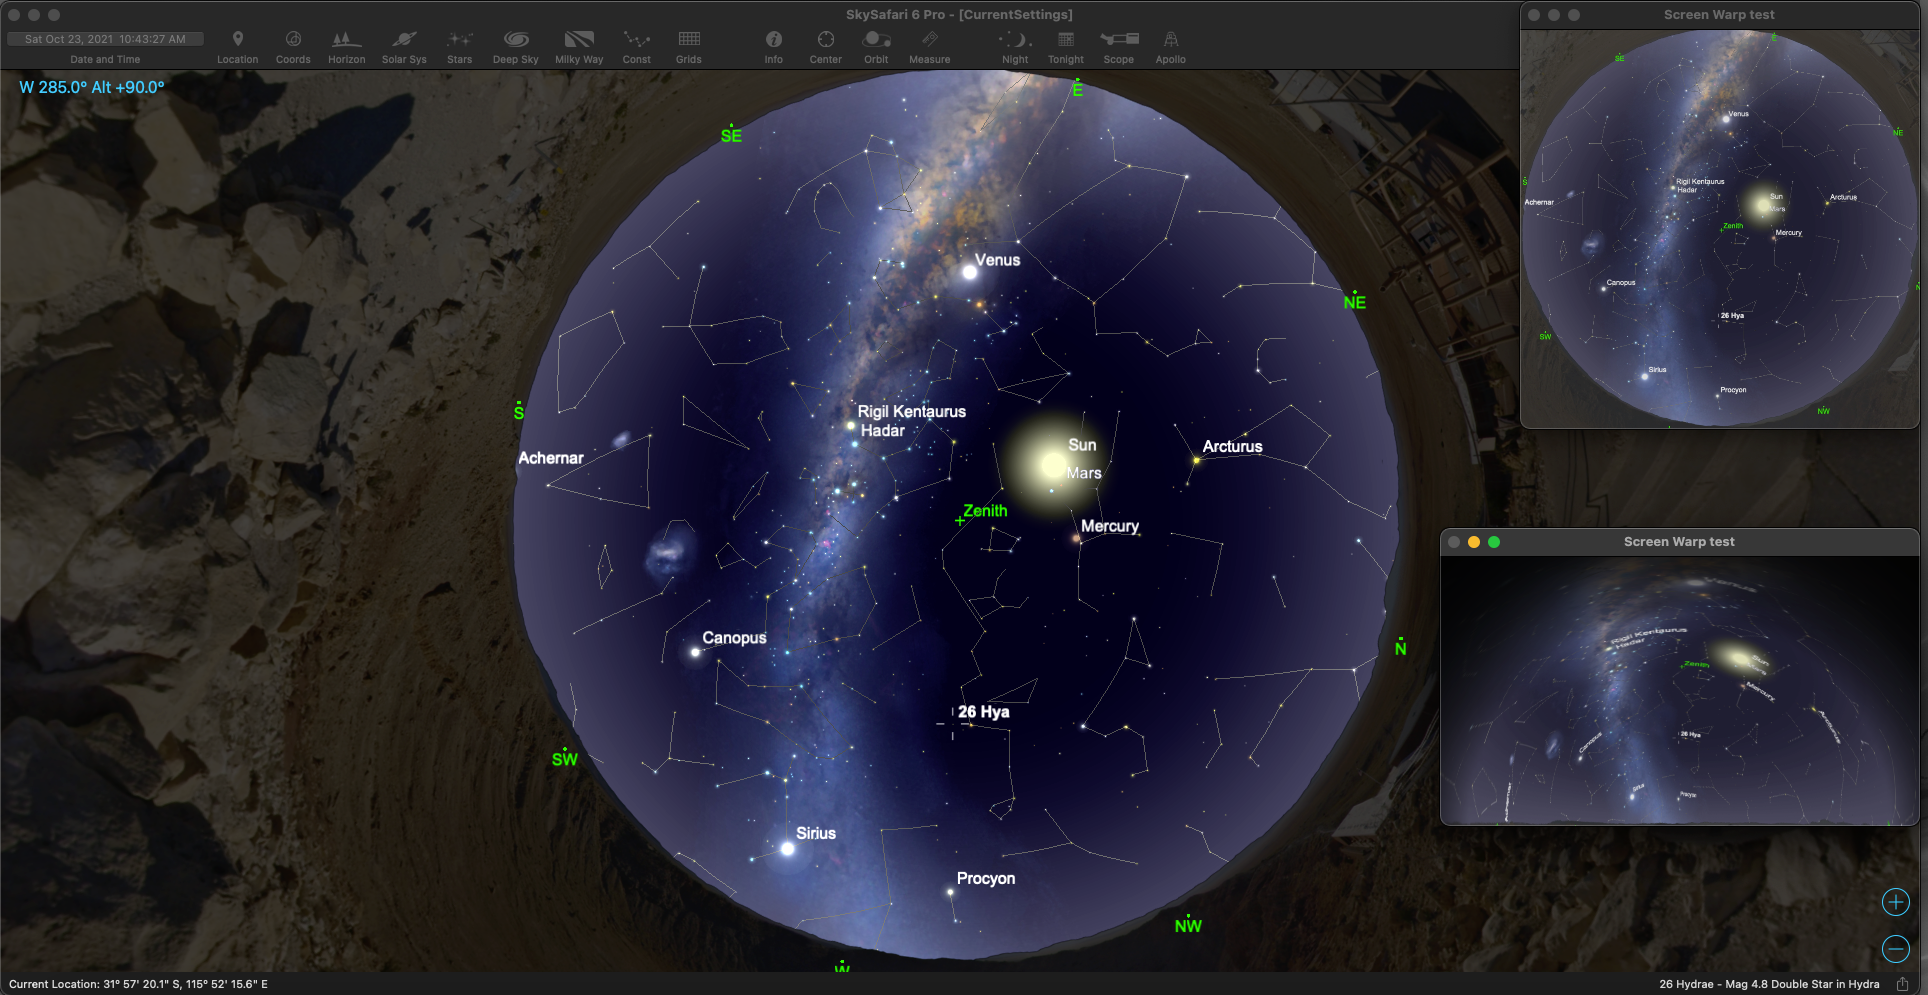
If all goes well the primary and warped screen should look as follows. 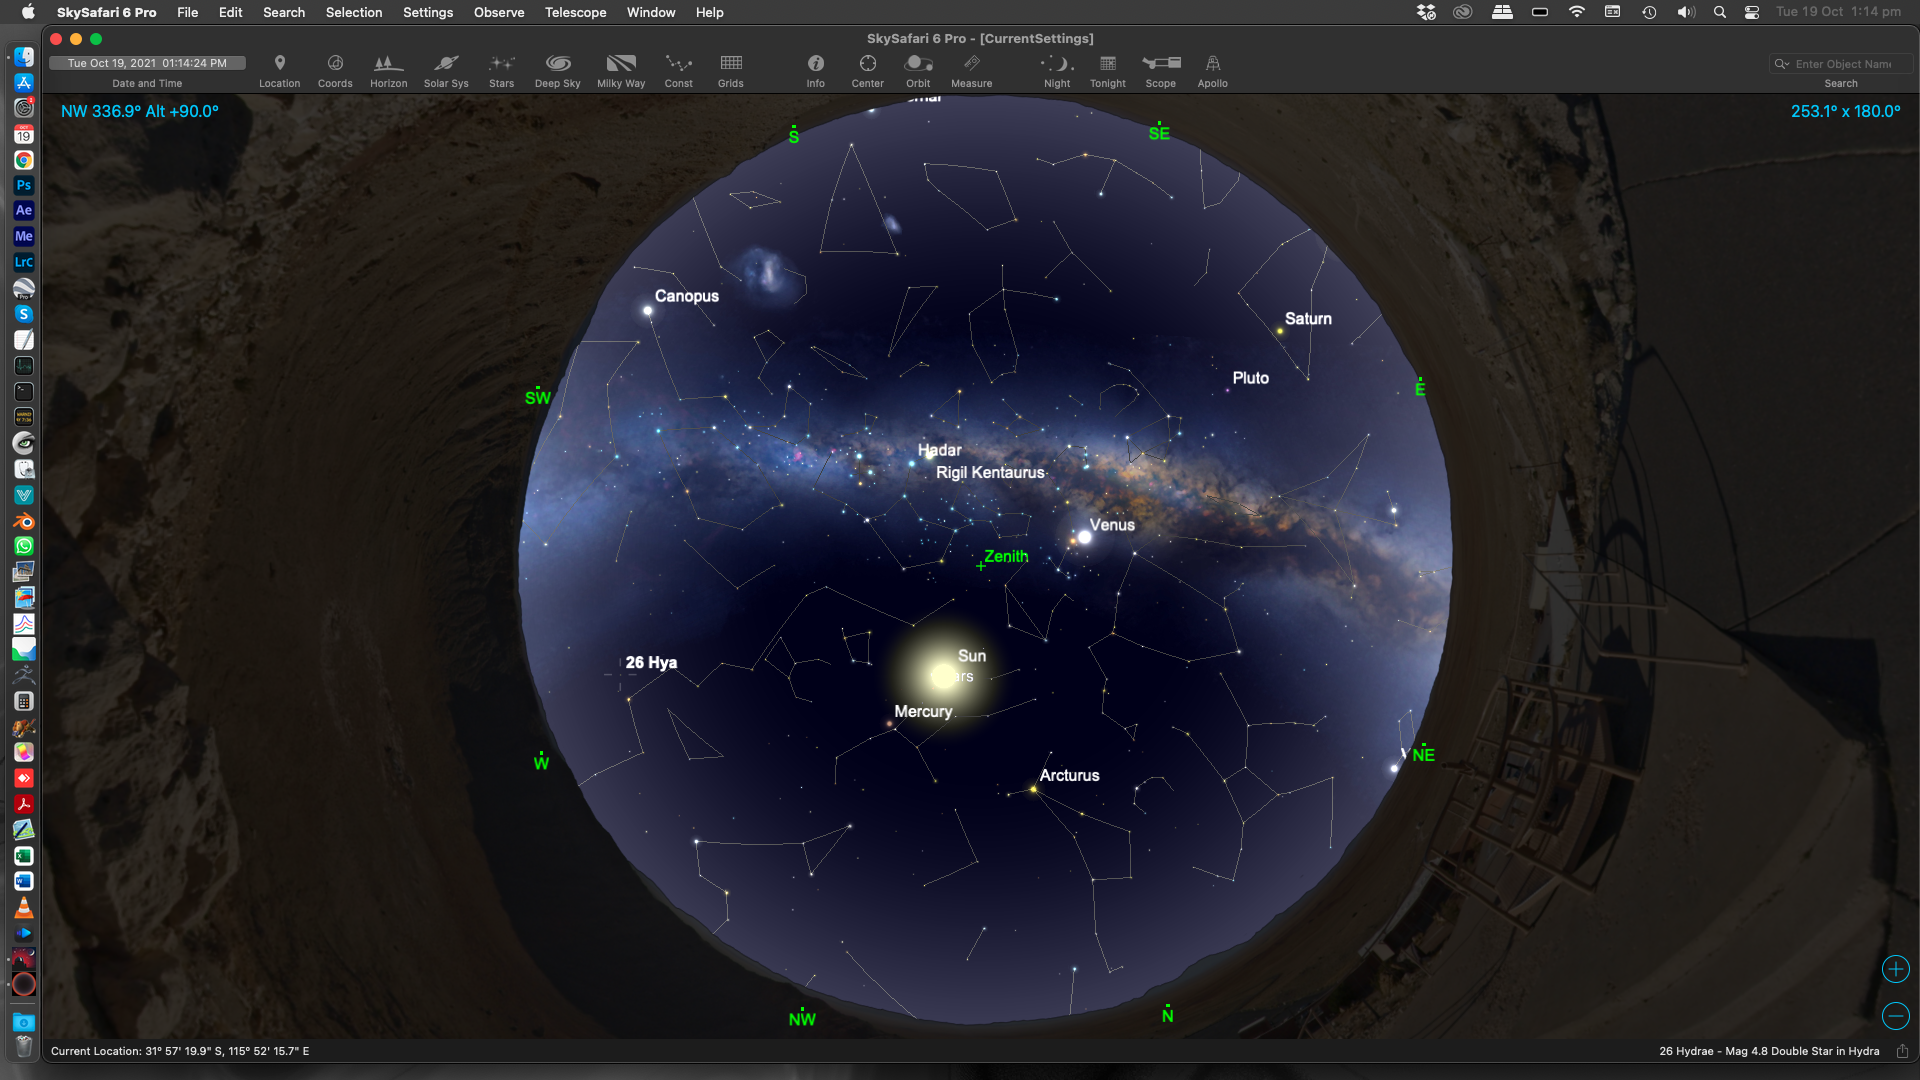

Notes
When employing screen warping with Stellarium the following are some useful tips.
This is a combination of the offset fisheye movie player (correcting for a non-central fisheye lens projection system) and the screen capture warping. Except here the offset fisheye warping is applied to a region of the screen. The expectation is that the region being warped is a fisheye image. In this case there is no contraol pane, but rather the parameters for the screen capture and warping ar found in a config file located in the applications package contents. The config.txt file simply contains 5 numbers, for example 10 60 1200 0 0 The first two digits refer to the top left corner of the fisheye region, the third is the width and height of the fisheye region and the last two are the horizontal and vertical offsets in the range of 0 to 1. If this is being used for Stellarium then the same comments relating to configuring Stellarium above apply. As do the techniques for getting around Apples app security for screen capture in the screen capture warping section above. In a typically setup the following is an example of the primary display and the secondary display. 
To determine the offset amounts visually, the left-right-top-bottom arrows keys can be used. The "o" key will toggle a small window on the primary display showing the values which can then be entered into the config file for automatic setting in the future. To determine the top-left corner of the capture region one can perform a screen capture (command-shift-3) and measure the pixel values in ones favourate image editing software.
This player takes a dual fisheye stereoscopic movie, warps each half, and presents it to a stereoscopic capable projector in either side-by-side or top-bottom format. The source movie is assumed to have a 2:1 aspect ratio with the left eye fisheye on the left half and the right eye fisheye on the right half of the frame. It is otherwise identical to the monoscopic fisheye movie player. The current control pane looks as follows. 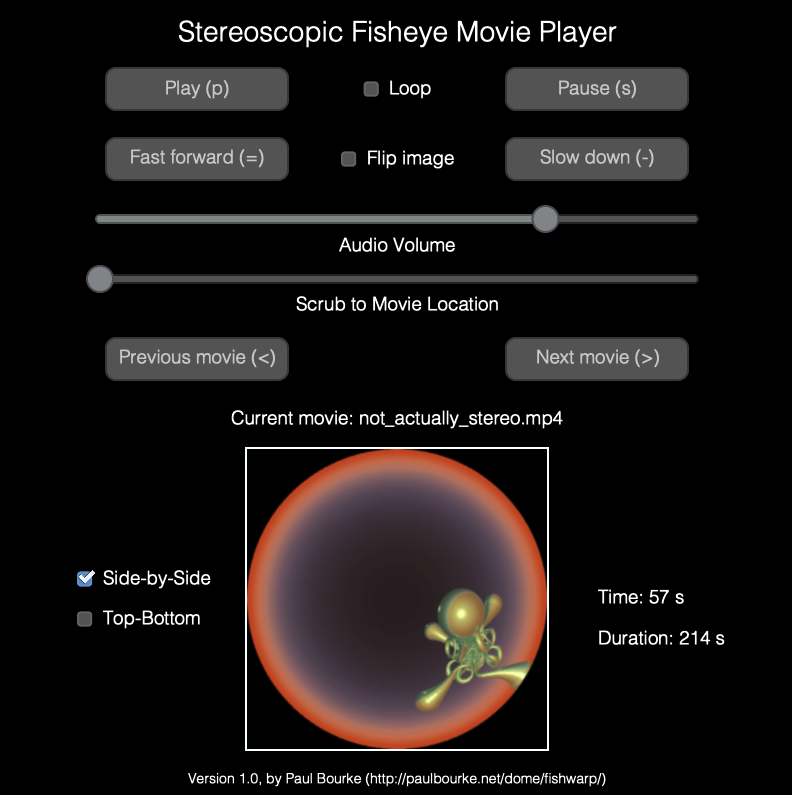
The output on the secondary display is as follows for side-by-side stereoscopic format and top-bottom format. 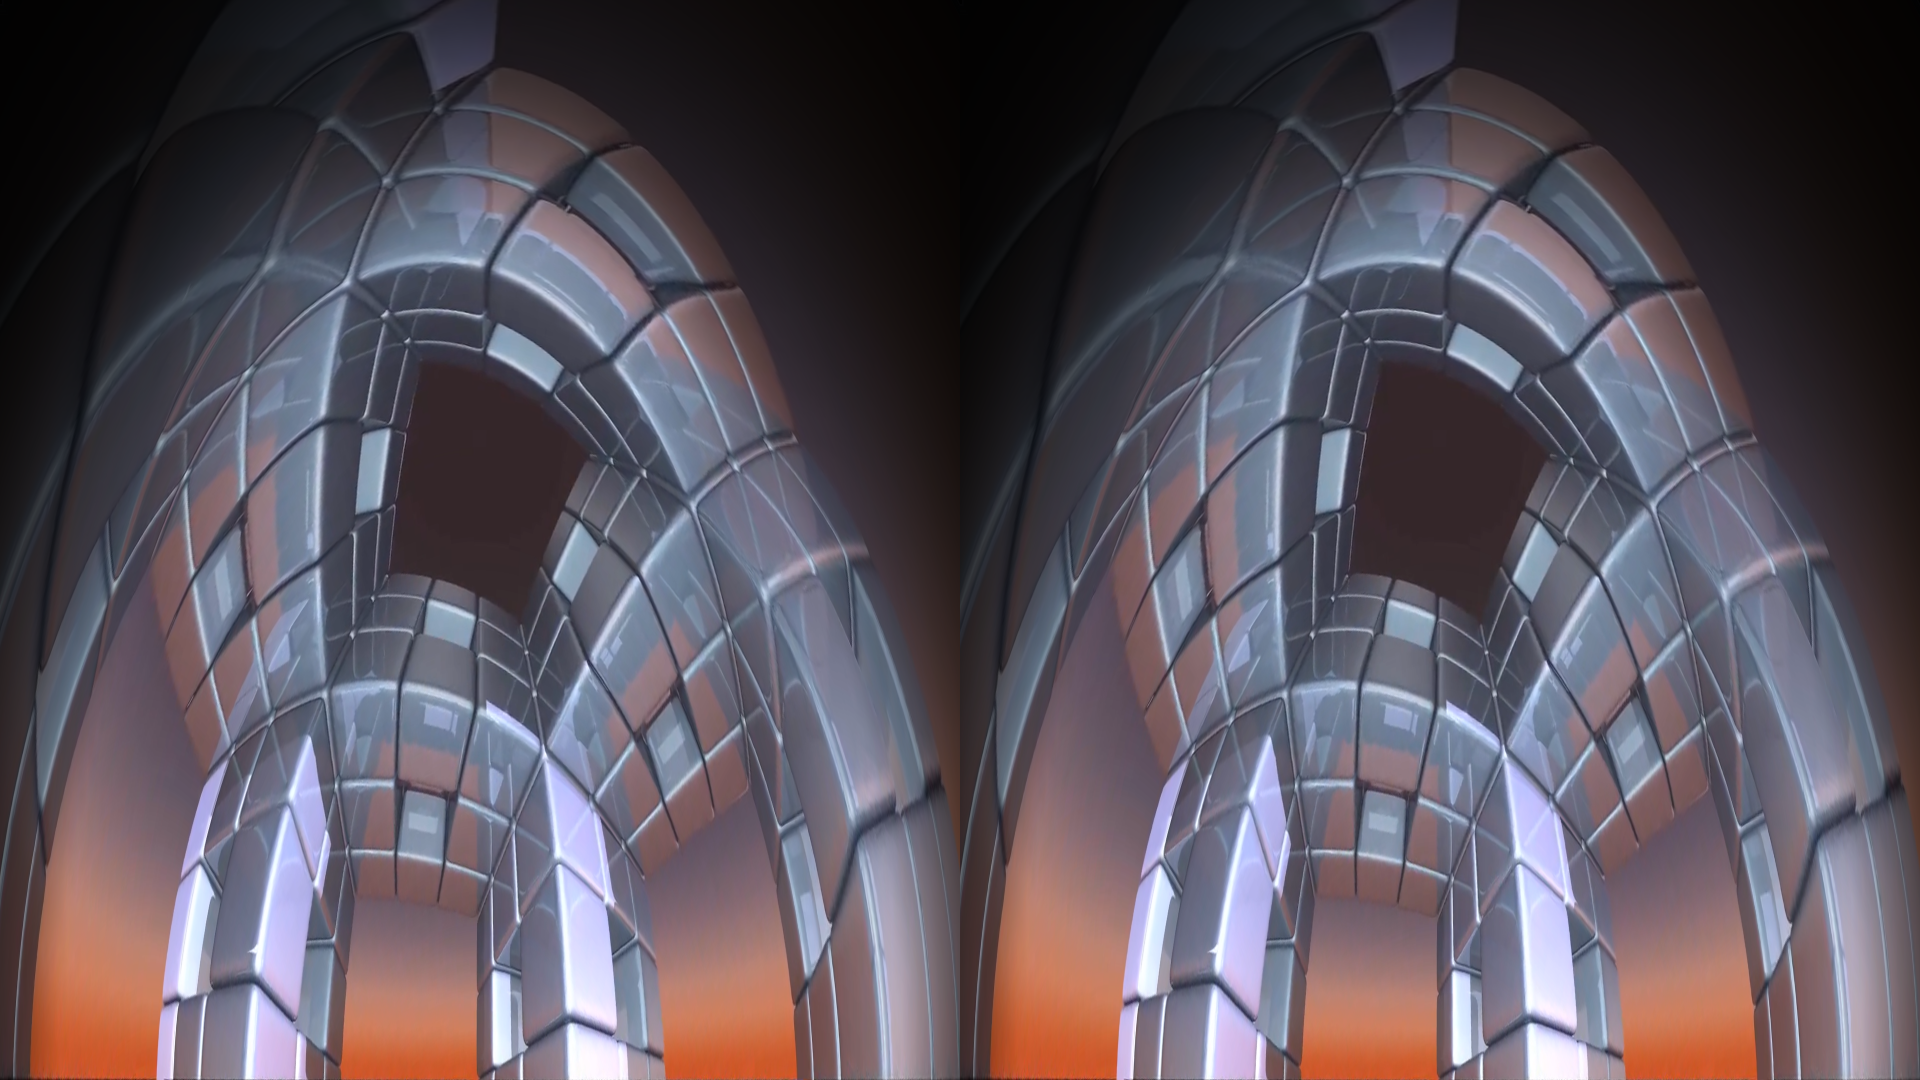

To test before buying please download one of the following demonstration versions. These are full featured except the movie is converted to greyscale the words "Demo version" are added. Please report problems with the demonstration version to the author. With the release of Sequoia, Apple have started making it harder to run applications not purchased through the App Store. At the time of writing, the solution would appear to be as described in this thread. For MacOs Sonoma and earlier one can generally just right click and choose the open option. Alternatively a script is provided to remove Gatekeeper/Sandbox restrictions.
All the above software is available for the one price, that is, if you purchase a license for one then the others are also available. This includes meshmapper for creating customised warp mesh files. When you are ready, click on the PayPal purchase button below. If PayPal isn't convenient, and/or you need an invoice/receipt please contact the author.
The author is prepared to consider customised versions of the tools here, or new features. If you have feature requests feel free to send them to the author. If multiple people ask for the same feature then it may be implemented in the future. Alternatively you may wish to commission a new feature or other customisation. The cost of any customisation will depend on the degree of difficulty and whether you require exclusive rights or if it can be shared with the community.
|
