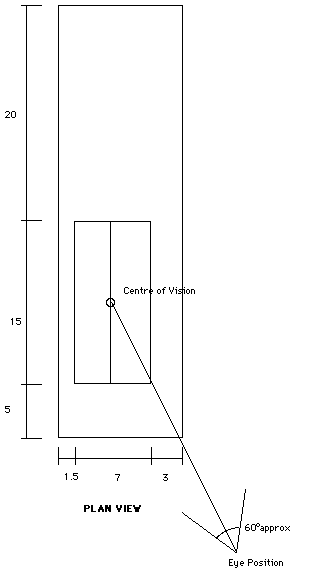
MacPerspective Introductory tutorialOpen the MacPerspective programme by double clicking the MacPerspective icon. First pull down the Coordinates menu, and select Units.Decimal. Otherwise you would have to deal in imperial units, ft-inches. At the bottom right of the screen you see a box asking you to enter the 'Eye position.' For the example which we are about to follow, the Eye position is as shown in Figure 1. 
figure 1. Plan of a building site, also showing the perspective viewing position. We arbitrarily choose that the front left hand corner of the site will be the 'origin' of the three dimensional coordinate system. Then the Eye Position as shown in the Plan is at X 15 Y -10 Z 1.5 (ie. 15m up the road, 10m back from the boundary, and at approximately eye height above the ground level.) This position is chosen to so that the whole building will be encompassed within a 60o 'cone of vision'. Type this sequence of letters and numbers: X15Y-10Z1.5, then press either the Return key or the Enter key to record the eye position. Next the 'Centre-of-vision' is asked for, This should usually be near to the centre of the building, and in this case a suitable centre is X 5 Y 12.5 Z 1.5. Input this by typing 'X5Y12.5Z1.5 return'. Constructing the perspective drawingWith any luck you will now be prompted to enter the Starting Point. The Coordinate Display is the boxes at the lower left of the screen. It records the location of the currently active point in the data structure. Note the coordinate convention that is used in this programme:
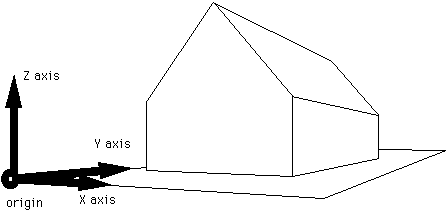
The directional senses, right, back, and up, are numerically positive, whereas left, forwards and downwards are negative directions. The position of the active point can be changed by typing X or Y or Z, followed by a number - this identifies a new absolute position - or by typing R, L, F, B, U, or D (right, left, front, back, up or down) followed by a number. This would designate a relative movement.
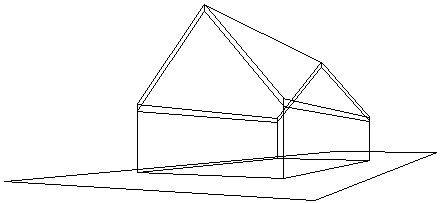
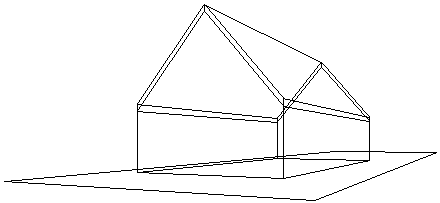
Choose the starting position to be the left front bottom corner of the house. Enter X 1.5 Y 5. (Since the default starting point is the origin, it is not necessary to enter Z 0 before you hit the 'Return' or 'Enter' key.) Now to enter a floor plan for the building, type R 7 Enter; a line will be drawn right across the screen, representing the front of the house. Don't worry that the line seems too long. The display system chooses a scale that will fill the entire screen with the current data structure. As more lines are added to the data structure, the rest of the building will become visible. Now enter B 15 Enter to mark a side edge of the floor. Then, to complete the rectangle, hold down the Clover key and hit R. (clover is always used in conjunction with some other key, being held down while the other key is engaged.) clover-R completes the rectangular floor and brings the active point back to the starting position. Now type U 3, to form the first vertical wall corner. (Remember Enter or Return is required after every entry) To form the next corner, you want to move to the front right corner of the floor, but not to draw a line to this point. To move the active point without drawing a line, hold the clover key down while pressing Enter or Return. So type D 3 R 7 clover-Enter, to get the active point to the new position. Typing U 3 now produces the next wall corner. Now draw in the other two corners in the same way. To construct the tops of the walls, lines are to be drawn between already defined points. The active position can be moved to any existing point in the data structure simply by positioning the arrow at the point, holding down the clover key, and clicking the mouse. Then to draw to any other existing point, simply click the mouse on it. Try it. Use the methods you have learned so far to draw the ridge of the roof 7m above ground level. Deleting lines and removing them from the data structureThis can be achieved by holding the Shift key down, pointing to the line that you want to remove, and clicking the mouse. Use this method if at any point in this exercise you happen to draw a wrong line. UndoUndo is another generally useful command, it allows you to undo the last operation you completed. Undo is clover-Z.Now draw the site boundaries, beginning at the origin point, X 0 Y 0 Z 0. Use the site data from Figure 1. To add a little realism to the building, try creating barges and gutter boards by duplicating a group of lines. (See Figure 3.) Type clover-M. This provides a facility for moving, duplicating, or deleting a group of lines. Select the lines to be duplicated by clicking on each in turn. Or an alternative way to select them is to hold the option key and drag the mouse, producing a broken-line rectangle to completely enclose the desired collection of lines. When the roof edge lines are selected, type D .3 then click on the word, DUPL at the lower right of the screen. To get out of this modification mode, click on the word Cancel. ZoomingTo zoom in on a region of the view, you drag the mouse diagonally. A solid rectangle the same shape as the screen will show the extent of the new zoomed view. To zoom out, you double click the mouse button anywhere on the screen. This will cause the view to revert to the original size, ie so the whole data structure is displayed.
Saving the Data StructureSelect Save under the File menu. A dialogue box is displayed. If the icon at the top of the dialogue box does not correspond to the disk in the disk drive of your machine, click on the word Drive until it does so. Then type a name for your file, 'Structure', and click the word Save. Saving should be done frequently. Removing hidden linesTo make this perspective view clearer, all of the lines that shouldn't be seen can be removed by Shift-clicking on them. But notice that the boundary lines are only partly hidden by the bulk of the house. Another editing tool is available to deal with this. To erase part of a line, type clover-E. Then position the arrow cursor precisely on one end of the line segment that you want to erase, and drag the mouse to the other end of the same line segment. When you release the mouse button, the line segment should disappear. (Your positioning may not have been accurate enough, and you sometimes need to zoom in in order to select line endings precisely) Line segments begin and end either on end points or at intersection points where other lines cross.
PrintingBefore trying to print, save your drawing, but do not save it as 'Structure' because this view that you now have is incomplete. It has the hidden lines missing from it. Save it as 'View' instead. Then select 'Print' from the 'File' menu. A dialogue box asks you to specify the size of the drawing you want in inches. An A4 page is about 7 inches wide, so enter the size as 6 inches, click OK, and wait for output from the printer. Finally, alter the view position to see that the data structure is now incomplete. To change the view position, type clover-V. Enter a bird's-eye position, such as X 100 Y 50 Z 20. (Keep the same centre of vision as before, so that you are still looking at the house. Just hit Return when asked to enter the centre of vision.) When the new view is displayed on the screen you are asked whether you wish to revert to the old position. Click on the word, No.
Plan and elevation views are also available in the View menu, viewing the data structure from the top, sides and front and back. These are not perspective views, but they are useful for constructing complex shapes. Because the data structure of 'View' is incomplete, you should return to the old file, 'Structure', that you saved before. This is achieved by Close-ing 'View' and Open-ing 'Structure'. Select Close from the File menu. Then select Open. Select the file 'Structure'. This should get you back to the full data structure for your house. Carry on from here as you like, to put in doors and windows, etc. etc. Summary of CommandsX R L X-axis movement Y B F Y-axis movement Z U D Z-axis movement clover-Enter Move without drawing a line clover-Z Undo the last operation Shift-click Remove a line Drag Mouse Zoom Double click Un-zoom clover-M Move, Duplicate, Delete facility Option-drag Select lines in a region. (Only in context of clover-M.) clover-E Erase segments of lines. |


